NGINX + WORDPRESS + 멀티페이지 설치방법
1. wp-config.php 파일 설정
define('WP_ALLOW_MULTISITE', true);
define('WP_ALLOW_MULTISITE', true);2. wp관리자 로그인 - 도구 - 네트워크 설정 중 wp-config.php 파일 내 수정코드 수정
define('MULTISITE', true);
define('SUBDOMAIN_INSTALL', true);
define('DOMAIN_CURRENT_SITE', 'examplewp.com');
define('PATH_CURRENT_SITE', '/');
define('SITE_ID_CURRENT_SITE', 1);
* 반드시 1번 코드를 삭제해주어야함.. 이것도 모르고 계속 같이 반영했다가 삽질..
/------- 참고 -------/
Introduction
WordPress's multisite feature offers the ability to create multiple websites from a single installation of WordPress. Each site can have a separate theme, set of plugins, and collection of content (posts and pages). This reduces the overhead of maintaining and updating several installations of WordPress, while allowing you to host multiple sites which are totally unrelated to one another.
WordPress multisite comes in two flavours: subdirectory or subdomain. In this tutorial, we will set up WordPress multisite to use subdomains. That means that sites we create will have a subdomain web address like http://wp-site.yourdomain.com. This can be mapped to an external domain like http://wp-site.net so that each site looks independent from the outside.
Prerequisites
This tutorial requires the user to have a knowledge of the following:
We will be creating three WordPress sites with the following domain names:
Site 1:
Domain: examplewp.com (Primary domain)
This is the site that is created when WordPress is installed.Site 2:
External Domain: shoppingsite.com
Subdomain: shoppingsite.example.comSite 3:
External Domain: companysite.org
Subdomain: companysite.example.com
The first domain is the primary domain name through which WordPress will be installed. Make sure to set up DNS for all three domains to point to the IP address of the Droplet which will host WordPress.
Step One - Set Up DNS Wildcard Records
In this section, we will add a DNS wildcard record for the primary domain so that more sites can be added at any time, without needing individual A records. (Alternately, you can add a new A record for each subdomain.)
Note: This has to be done only for the *primary domain (examplewp.comin this tutorial).
Log in to your DigitalOcean control panel and navigate to the Networking section. Edit the primary domain and create a wildcard A record for this domain pointing to the Droplet's IP address. A wildcard record is created by entering an asterisk (*) in the hostname input box as shown in the screenshot below.
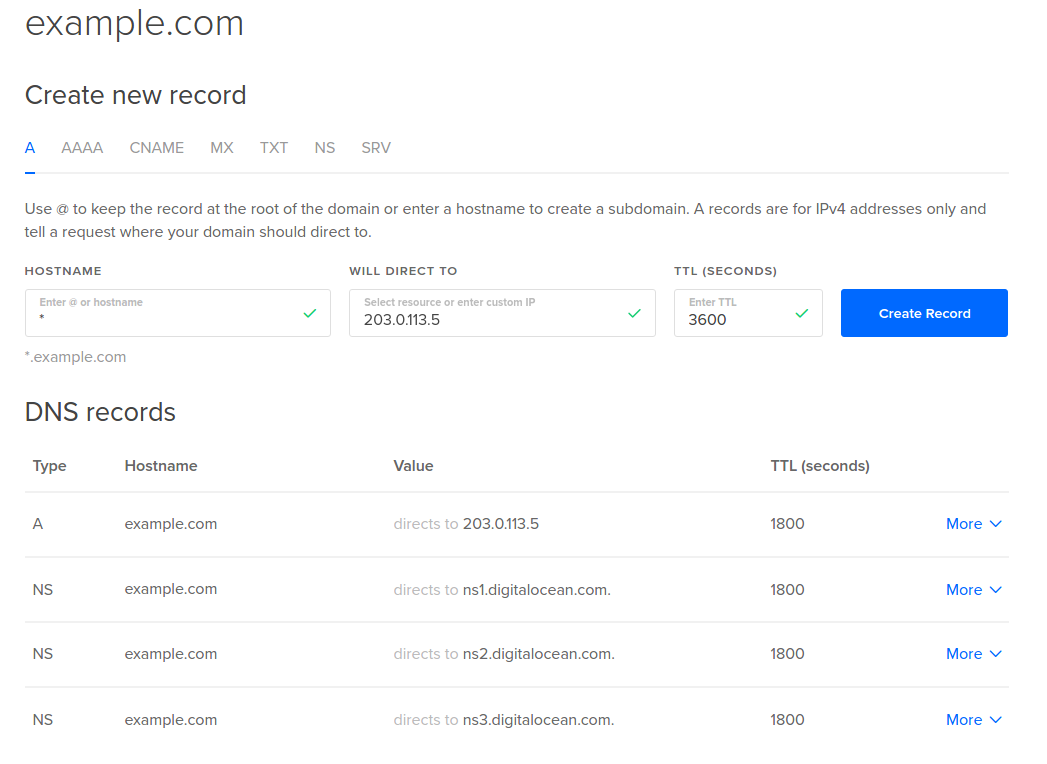
If you host your domain's DNS elsewhere, you should set the wildcard record there instead.
What you should see now:
DNS queries for any random-sub-domain.examplewp.com should return the IP address of your Droplet.
Step Two - Install and Configure the LEMP Stack
In this section, we will install and configure Nginx, MySQL, and PHP. There is a detailed article on setting up a LEMP stack that you can reference if you would like to. This section will serve as a quick setup. There is also a LEMP on Ubuntu 14.04 image under the Applications tab in the Select Image section when creating a Droplet.
Update the repositories and install Nginx, MySQL, PHP5-FPM and other necessary PHP modules.
apt-get update
apt-get install -y nginx mysql-server php5-fpm php5-mysql php5-curl php5-mcrypt php5-gd
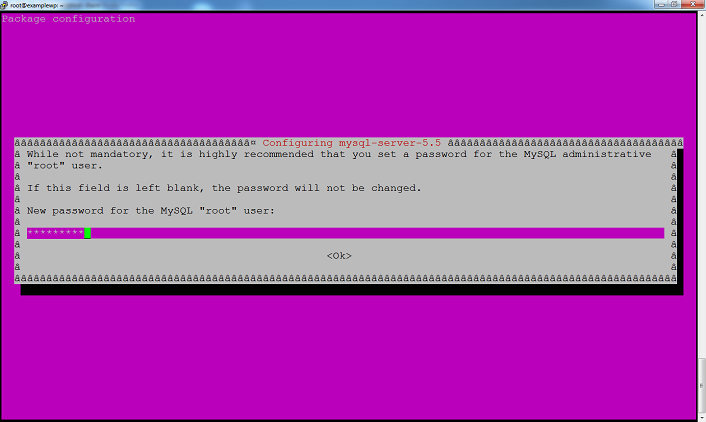
When MySQL server is being installed, you will be prompted to enter a password for the root database user. Please enter a strong password and do not leave it blank. You will enter the password twice.
Create a document root for Nginx which will hold the WordPress files. We will use /usr/share/nginx/wordpress throughout this tutorial.
mkdir /usr/share/nginx/wordpress
We will replace Nginx's default virtual host with our own, so remove its symlink in the sites-enableddirectory.
rm /etc/nginx/sites-enabled/default
Create a new virtual host file inside the sites-available directory. This file can be named anything. In our example, we will call it wp-ms.
nano /etc/nginx/sites-available/wp-ms
Edit this file and place the following configuration. Edit the text highlighted in red according to your environment. In the server_name line, you should add all three (or more) of your multisite domains, and the wildcard subdomain for the first domain.
server {
    listen [::]:80 ipv6only=off;
    server_name examplewp.com *.examplewp.com shoppingsite.com companysite.org;

    root /usr/share/nginx/wordpress;
    index index.php index.html index.htm;

    location / {
        try_files $uri $uri/ /index.php?$args ;
    }

    location ~ /favicon.ico {
        access_log off;
        log_not_found off;
    }

    location ~ \.php$ {
        try_files $uri /index.php;
        include fastcgi_params;
        fastcgi_pass unix:/var/run/php5-fpm.sock;
    }

    access_log  /var/log/nginx/$host-access.log;
    error_log   /var/log/nginx/wpms-error.log;
}
If this Droplet will host only this WordPress installation, the listen and server_name directives can be changed to the following:
listen [::]:80 default_server ipv6only=off;
server_name examplewp.com *.examplewp.com;
The use of the $host variable in the access_log directive creates separate log files for each domain like examplewp.com-access.log and shoppingsite.com-access.log. It is not possible to use such variables for the error_log directive, so all errors are logged in a single file.
Save this file and create a symlink of this file inside the sites-enabled directory.
ln -s /etc/nginx/sites-available/wp-ms /etc/nginx/sites-enabled/wp-ms
Execute an Nginx configuration test and restart if it returns OK.
service nginx configtest
service nginx restart
Step Three - Create a MySQL Database and User for WordPress
In this section, we will create a MySQL database for WordPress and a user with permissions for this database only.
Log in to the MySQL command line as the root user.
mysql -u root -p
Create a database.
CREATE DATABASE wordpress;
Create a MySQL user and grant permissions to this database:
CREATE USER 'wordpress_user'@'localhost' IDENTIFIED BY 'password';
GRANT ALL PRIVILEGES ON wordpress.* TO 'wordpress_user'@'localhost';
Replace the word password with a strong password. Flush the privileges and exit the MySQL command line.
FLUSH PRIVILEGES;
exit
Note down these details as will be needing them in Step Four.
Database Name: wordpress
Database User: wordpress_user
Database Password: password
More information about MySQL users can be found in this article.
Step Four - Download and Install WordPress
In this section, we will download the latest version of WordPress and install it. This will be for our first site, examplewp.com.
Download and extract WordPress.
wget http://wordpress.org/latest.tar.gz
tar -xf latest.tar.gz
Move the extracted files into the document root.
mv wordpress/* /usr/share/nginx/wordpress/
Assign ownership to the user www-data. This is essential for media uploads and for core/plugin/theme updates to work in WordPress.
chown -R www-data:www-data /usr/share/nginx/wordpress
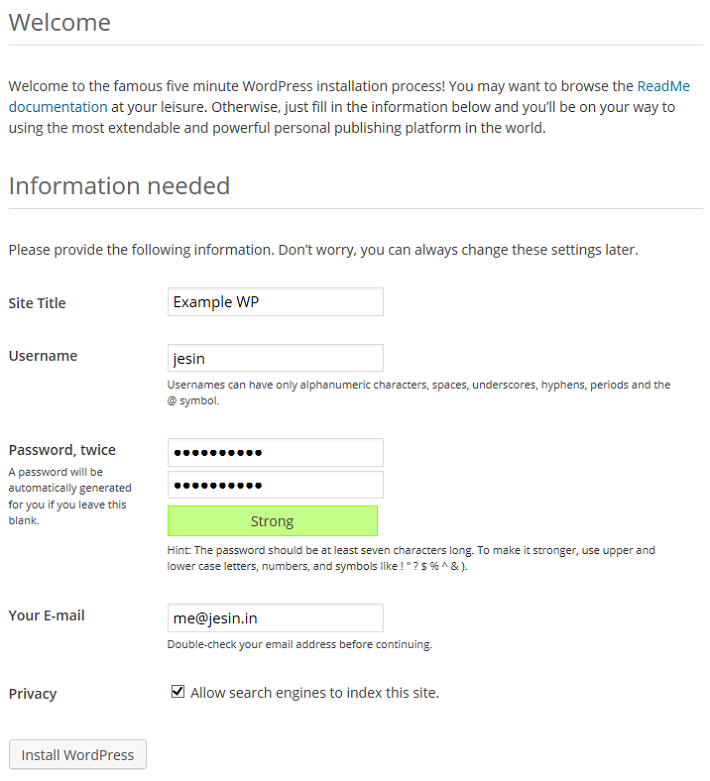
Access the primary domain in your browser to begin the WordPress installation.
http://examplewp.com/
You can add the "www" suffix to the URL if needed. Click the Create a Configuration File button followed by the Let's go! button. Fill in the database details (use the information from Step Three) and click Submit.

At this point, WordPress will establish a connection with the database to test the entered credentials. Once the connection succeeds, the Run the install button appears. Click on it. Complete the Information needed form to set up your site title, username, password, and email, and then click Install WordPress. It is recommended to choose a non-generic username for security.
Step Five - Enable Multisite and Create Additional Sites
In this section, we will enable WordPress Multisite and create the two additional sites mentioned in the Prequisites section of this article.
A PHP constant has to be defined in the wp-config.php file to enable the Network Setup page.
Edit the wp-config.php file:
nano /usr/share/nginx/wordpress/wp-config.php
Add the following code before the comment /* That's all, stop editing! Happy blogging. */:
/* Multisite settings */
define( 'WP_ALLOW_MULTISITE', true );
We will be editing this file a few more times during this tutorial. Feel free to add all of the new lines in the /* Multisite settings */ section we just created.
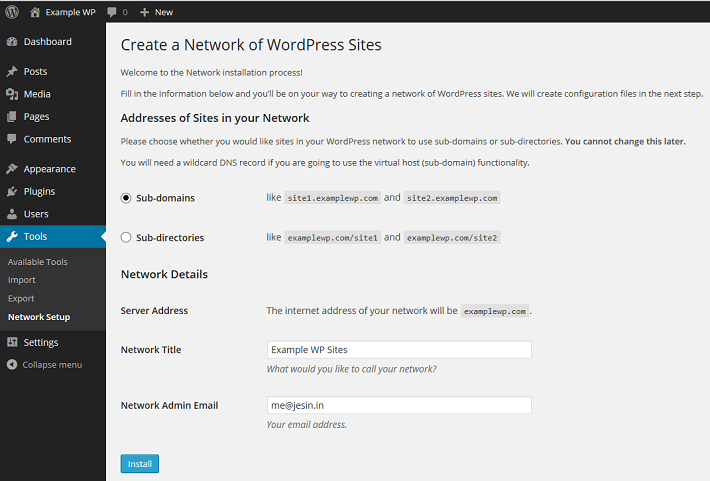
Save the file. Log in to the WordPress admin panel and navigate to Tools > Network Setup. Choose the Sub-domains option, modify the Network Title as desired, and then click Install.
You will be presented with two blocks of code to be added in the wp-config.php and .htaccess files. Copy the wp-config.php code which looks similar to the following:
define('MULTISITE', true);
define('SUBDOMAIN_INSTALL', true);
define('DOMAIN_CURRENT_SITE', 'examplewp.com');
define('PATH_CURRENT_SITE', '/');
define('SITE_ID_CURRENT_SITE', 1);
define('BLOG_ID_CURRENT_SITE', 1);
Edit the wp-config.php file.
nano /usr/share/nginx/wordpress/wp-config.php
Add these lines before the comment /* That's all, stop editing! Happy blogging. */ and save it. The code displayed for .htaccess can be ignored, as Nginx does not have this file.
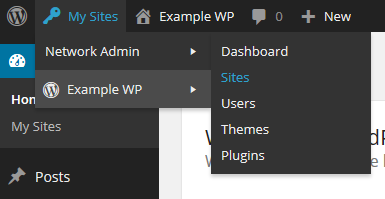
Log out of the WordPress admin panel, and log in again. From the admin toolbar on the top left, navigate to the My Sites > Network Admin > Sites.
Click the Add New button to open the Add New Site form. The following screenshot shows the filled-in details for the shopping site in our example. The Site Address entered will form the subdomain of this site.
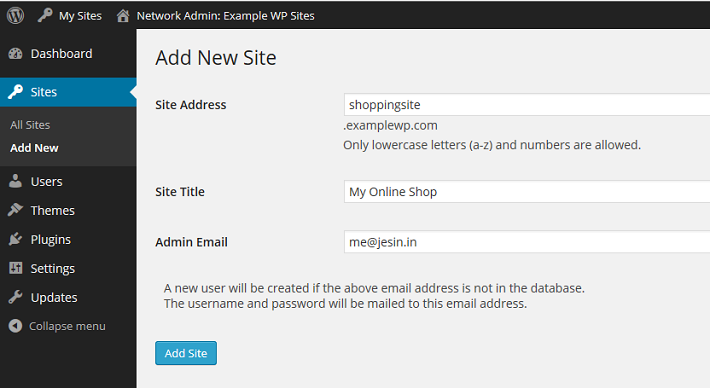
Click Add Site and the created site will be accessible via http://shoppingsite.examplewp.com.
Repeat these steps to create the second site (companysite.examplewp.com in our example).
What you should see now:
The following three WordPress sites:
- examplewp.com
- shoppingsite.examplewp.com
- companysite.examplewp.com
Each of them will have their own content, theme, and active set of plugins.
Step Six - Set Up Domain Mapping
In this section, we will enable you to use a separate domain name for each WordPress site, by downloading and enabling the WordPress MU Domain Mapping plugin. This plugin allows users of WordPress Multisite to map their blog/site to another domain.
Log in to your Droplet via SSH and download the WordPress MU Domain Mapping plugin. First install the unzip command, and then extract the plugin.
wget http://downloads.wordpress.org/plugin/wordpress-mu-domain-mapping.latest-stable.zip
apt-get install unzip
unzip wordpress-mu-domain-mapping.latest-stable.zip
Move the extracted files to the WordPress plugin directory.
mv wordpress-mu-domain-mapping /usr/share/nginx/wordpress/wp-content/plugins/
Copy the sunrise.php file from the plugin's directory to the wp-content directory.
cp /usr/share/nginx/wordpress/wp-content/plugins/wordpress-mu-domain-mapping/sunrise.php /usr/share/nginx/wordpress/wp-content/
Edit the wp-config.php file and add the following line before the comment /* That's all, stop editing! Happy blogging. */.
File: /usr/share/nginx/wordpress/wp-config.php
define('SUNRISE', 'on');
Save this file and return to the web browser. From the WordPress toolbar navigate to My Sites > Network Admin > Plugins.

Click the Network Activate link under the WordPress MU Domain Mapping plugin. Go to Settings > Domain Mapping and make changes to the Domain Options as follows:
- Uncheck Remote Login
- Check Permanent Redirect
- Uncheck Redirect administration pages to site's original domain
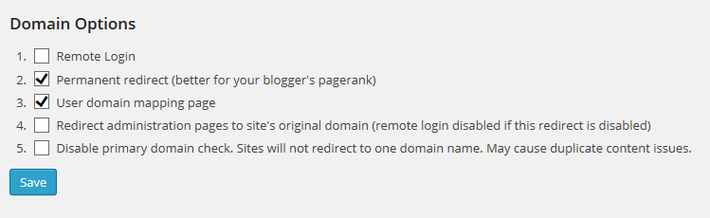
Click Save once done. These settings redirect all requests for subdomains (like companysite.examplewp.com) to their respective external domains (like companysite.org) including the administration pages (/wp-admin).
In the next step we will be mapping a domain name to each site based on its site ID. There are many ways to find the ID of a site but for easier administration we will create a simple WordPress Must-use plugin that displays an additional ID column on the Sites page.
Log in to your Droplet via SSH and create an mu-plugins directory.
mkdir /usr/share/nginx/wordpress/wp-content/mu-plugins
Create a PHP file inside this directory and paste the code that follows:
nano /usr/share/nginx/wordpress/wp-content/mu-plugins/wpms_blogid.php
You can copy this content exactly:
<?php
add_filter( 'wpmu_blogs_columns', 'do_get_id' );
add_action( 'manage_sites_custom_column', 'do_add_columns', 10, 2 );
add_action( 'manage_blogs_custom_column', 'do_add_columns', 10, 2 );

function do_add_columns( $column_name, $blog_id ) {
    if ( 'blog_id' === $column_name )
        echo $blog_id;
    return $column_name;
}

function do_get_id( $columns ) {
    $columns['blog_id'] = 'ID';
    return $columns;
}
The Sites > All Sites section should now show an additional ID column.
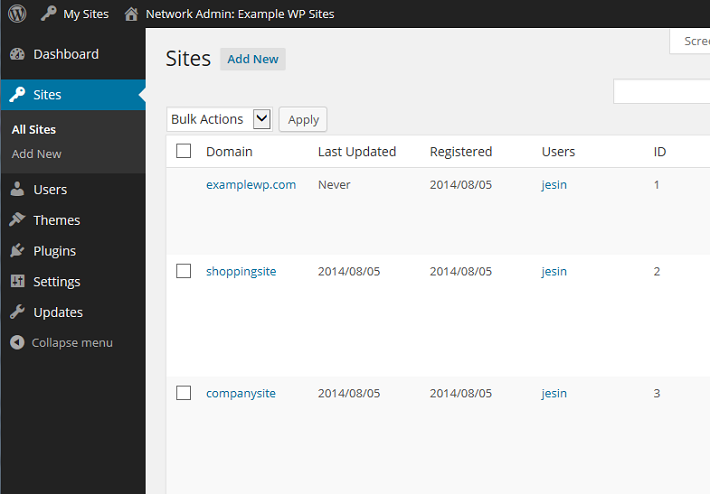
Note down the ID values for each site and go to the Settings > Domains page. Enter the site ID followed by the external domain for the site. For example, since companysite has an ID of 3, on this page, the Site ID should be 3, and the domain should be companysite.org.
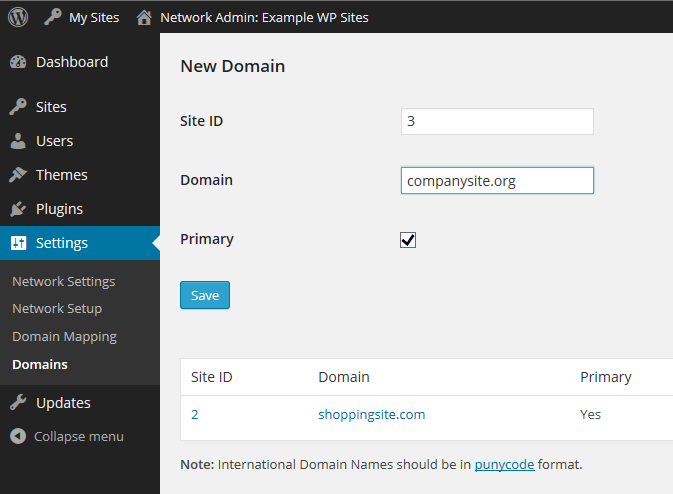
You may add a "www" prefix if you wish to set the site URL as www.companysite.org. Repeat these steps for the other domains. Click Save at the bottom of the page.
What you should see now:
Each site will have its own domain name instead of a subdomain; i.e., entering http://companysite.org in your browser will open the My Online Company Site. You can check this now by visiting http://shoppingsite.com and http://companysite.org. You should see the site title change in the upper left corner of the page.
Now each site can be maintained separately through its own WordPress admin panel:
http://examplewp.com/wp-admin/
http://shoppingsite.com/wp-admin/
http://companysite.org/wp-admin/
Updates to the core/plugins/themes and installation of plugins/themes should be done from the network admin page of the primary domain:
http://examplewp.com/wp-admin/network/* 출처 : https://www.digitalocean.com/community/tutorials/how-to-set-up-wordpress-multisite-with-nginx-on-ubuntu-14-04
'공부 > Wordpress' 카테고리의 다른 글
| [워드프레스] 우커머스 옵션 상품 설정하기 (0) | 2019.03.19 |
|---|---|
| 워드프레스 Prefix 변경하기 (1) | 2019.03.02 |
| 워드프레스 로그인페이지 리다이렉트 문제 (0) | 2018.02.18 |
| 위젯만들기2 - 위젯설정창에서 form 값 받아오기(광고넣기위젯) (0) | 2012.08.13 |
| 제작한 플러그인에 설정메뉴 넣기 (0) | 2012.08.10 |
