와 별거아니었는데 찾아보다 .. 드디어 됐다.

설정방법

먼저  xe.conf

다운받아 nginx가 설치된 경로에 업로드한다.
세부 주소 설정은 regex 공부해서 각자하면되고,  

나는 /etc/nginx/sites-available/에 올림


$cd /etc/nginx/sites-available/

$vi default

하고, 

server { root /usr/share/nginx/www/; index index.php index.html index.htm; server_name jasontody.com; location / { # First attempt to serve request as file, then # as directory, then fall back to index.html try_files $uri $uri/ /index.html; # Uncomment to enable naxsi on this location # include /etc/nginx/naxsi.rules } include /etc/nginx/sites-available/xe.conf;

이렇게 하고  nginx restart 시켜주면 끝.

$sudo /etc/init.d/nginx restart

ftp로 업로드 안하고 직접 xe.conf 작성해도 됨


xpressengine Admin에서 이것까지 체크해주면 끝


$passwd jasontody

또는

$sudo passwd USERID

쓰면 간단히 변경된다. 아마 sudo 해줘야 할듯. 

그리고 전에 한번 썼던 비밀번호로 다시 변경하려면 


Bad: new password is just a wrapped version of the old one


이라는 메세지가 뜨면서 변경이 되지 않고, 현재 비밀번호랑 같은 비밀번호를 입력해도

변경이 되지않는다. 참고

리눅스에 ftp 세팅을 하려고 sudo apt-get으로 설치 명령을 내렸더니

이런 메세지가떴다

/etc/sudoers is mode 0777 should be 0440


지금 chmod로 바꿔도 안되길래 찾아봤더니

해결법 


$ cd /etc/

$ su root

Password:

# chmod 440 sudoers

# ls -l sudoers

-r--r----- 1 root root 723 5월 16 14:23 sudoers

해결


기본적으로 ImageView사용하여 xml작성하였을경우


<ImageView android:id="@+id/imageView1" android:layout_width="fill_parent" android:layout_height="fill_parent" android:src="@drawable/img_jasontody" />

타이틀 말고 이미지 꽉 채우기

<ImageView android:id="@+id/imageView1" android:layout_width="fill_parent" android:layout_height="fill_parent" android:src="@drawable/img_jasontody"         android:scaleType="fitXY" />

타이틀까지 채우기

super.onCreate(savedInstanceState);

requestWindowFeature(Window.FEATURE_NO_TITLE); setContentView(R.layout.main_imagexml);


Webwait

웹 페이지 주소를 입력하면 페이지 로딩타임으로

간단하게 속도를 측정해볼 수 있다


Gtmatrix

Webwait보다 좀 더 객관적으로 ,항목별로 상세하게 체크해준다.


그림과 같이 스크롤이 움직여도 오른쪽 하단에 고정! (이 티스토리에도 적용)


간단하게 <div>로 id를 주고 <div id="value"> code </div>

css를 통해 적용시킨다. 코드


##HTML

    <div id="jasontody"><h3>Jasontody</h3></div>

##CSS

#jasontody { position: fixed; right: 0%; /* 위치 */ bottom: 0%; opacity: 0.5; /* 투명도 */ }


test1


ftp사용해서 웹에서 설치할때, 폴더 권한을

777로 줘야하는듯.

707안됨

sudo chmod 777 -R xe


Setup


The steps in this tutorial require the user to have root privileges. You can see how to set that up in the Initial Server Setup in steps 3 and 4. 

Before working with wordpress, you need to have LEMP installed on your virtual private server. If you don't have the Linux, nginx, MySQL, PHP stack on your VPS, you can find the tutorial for setting it in the LAMP tutorial

Once you have the user and required software, you can start installing wordpress!

Step One—Download WordPress


We can download Wordpress straight from their website:
wget http://wordpress.org/latest.tar.gz

This command will download the zipped wordpress package straight to your user's home directory. You can unzip it the the next line:
tar -xzvf latest.tar.gz 

Step Two—Create the WordPress Database and User


After we unzip the wordpress files, they will be in a directory called wordpress in the home directory on the virtual private server. 

Now we need to switch gears for a moment and create a new MySQL directory for wordpress. 

Go ahead and log into the MySQL Shell:
mysql -u root -p

Login using your MySQL root password, and then we need to create a wordpress database, a user in that database, and give that user a new password. Keep in mind that all MySQL commands must end with semi-colon. 

First, let's make the database (I'm calling mine wordpress for simplicity's sake; feel free to give it whatever name you choose):
CREATE DATABASE wordpress;
Query OK, 1 row affected (0.00 sec)

Then we need to create the new user. You can replace the database, name, and password, with whatever you prefer:
CREATE USER wordpressuser@localhost;
Query OK, 0 rows affected (0.00 sec)

Set the password for your new user:
SET PASSWORD FOR wordpressuser@localhost= PASSWORD("password");
Query OK, 0 rows affected (0.00 sec)

Finish up by granting all privileges to the new user. Without this command, the wordpress installer will not be able to start up:
GRANT ALL PRIVILEGES ON wordpress.* TO wordpressuser@localhost IDENTIFIED BY 'password';
Query OK, 0 rows affected (0.00 sec)

Then refresh MySQL:
FLUSH PRIVILEGES;
Query OK, 0 rows affected (0.00 sec)

Exit out of the MySQL shell:
exit

Step Three—Setup the WordPress Configuration


The first step to is to copy the sample WordPress configuration file, located in the WordPress directory, into a new file which we will edit, creating a new usable WordPress config:
cp ~/wordpress/wp-config-sample.php ~/wordpress/wp-config.php

Then open the wordpress config:
sudo nano ~/wordpress/wp-config.php

Find the section that contains the field below and substitute in the correct name for your database, username, and password:
// ** MySQL settings - You can get this info from your web host ** //
/** The name of the database for WordPress */
define('DB_NAME', 'wordpress');

/** MySQL database username */
define('DB_USER', 'wordpressuser');

/** MySQL database password */
define('DB_PASSWORD', 'password');
Save and Exit.

Step Four—Copy the Files


We are almost done uploading Wordpress to the server. We need to create the directory where we will keep the wordpress files:
sudo mkdir -p /var/www

We can modify the permissions of /var/www to allow future automatic updating of Wordpress plugins and file editing with SFTP. If these steps aren't taken, you may get a "To perform the requested action, connection information is required" error message when attempting either task. 

The first command changes the ownership of /var/www to www-data, the ubuntu web user and group. The subsequent two add a user to the group, and allow the group to read and write to any file in the directory.
sudo chown -R www-data:www-data /var/www
sudo usermod -a -G www-data username
sudo chmod -R g+rw /var/www

The final move that remains is to transfer the unzipped WordPress files to the website's root directory.
sudo cp -r ~/wordpress/* /var/www

Step Five—Set Up Nginx Server Blocks


Now we need to set up the WordPress virtual host. Create a new file for the for WordPress host, copying the format from the default configuration:
sudo cp /etc/nginx/sites-available/default /etc/nginx/sites-available/wordpress

Open the WordPress virtual host:
sudo nano /etc/nginx/sites-available/wordpress

The configuration should include the changes below (the details of the changes are under the config information):
[...]
server {
        listen   80; ## listen for ipv4; this line is default and implied
        #listen   [::]:80 default ipv6only=on; ## listen for ipv6

        root /var/www;
        index index.php index.html index.htm;

        # Make site accessible from http://localhost/
        server_name example.com;

        location / {
                # First attempt to serve request as file, then
                # as directory, then fall back to index.html
                try_files $uri $uri/ /index.php?q=$uri&$args;
                # Uncomment to enable naxsi on this location
                # include /etc/nginx/naxsi.rules
        }

        location /doc/ {
                alias /usr/share/doc/;
                autoindex on;
                allow 127.0.0.1;
                deny all;
        }

        # Only for nginx-naxsi : process denied requests
        #location /RequestDenied {
                # For example, return an error code
                #return 418;
        #}

        #error_page 404 /404.html;

        # redirect server error pages to the static page /50x.html
        #
        error_page 500 502 503 504 /50x.html;
        location = /50x.html {
               root /usr/share/nginx/www;
        }

        # pass the PHP scripts to FastCGI server listening on 127.0.0.1:9000
        #
        location ~ \.php$ {
                fastcgi_split_path_info ^(.+\.php)(/.+)$;
                # NOTE: You should have "cgi.fix_pathinfo = 0;" in php.ini

                # With php5-cgi alone:
                fastcgi_pass 127.0.0.1:9000;
                # With php5-fpm:
        #       fastcgi_pass unix:/var/run/php5-fpm.sock;
                fastcgi_index index.php;
                include fastcgi_params;
        }

        # deny access to .htaccess files, if Apache's document root
        # concurs with nginx's one
        #
        location ~ /\.ht {
               deny all;
        }
}
[…]
Here are the details of the changes:

  • Change the root to /var/www/

  • Add index.php to the index line.

  • Change the server_name from local host to your domain name or IP address (replace the example.com in the configuration)

  • Change the "try_files $uri $uri/ /index.html;" line to "try_files $uri $uri/ /index.php?q=$uri&$args;" to enable Wordpress Permalinks with nginx

  • Uncomment the correct lines in “location ~ \.php$ {“ section

Save and Exit that file.

Step Six—Activate the Server Block

Although all the configuration for worpress has been completed, we still need to activate the server block by creating a symbolic link:
sudo ln -s /etc/nginx/sites-available/wordpress /etc/nginx/sites-enabled/wordpress

Additionally, delete the default nginx server block.
sudo rm /etc/nginx/sites-enabled/default

Then, as always, restart nginx:
sudo service nginx restart

Step Seven—RESULTS: Access the WordPress Installation


Once that is all done, the wordpress online installation page is up and waiting for you: 

Access the page by visiting your site's domain or IP address (eg. example.com) and fill out the short online form (it should look like this).


Step One—Update Apt-Get


Throughout this tutorial we will be using apt-get as an installer for all the server programs. On May 8th, 2012, a serious php vulnerability was discovered, and it is important that we download all of the latest patched software to protect the virtual private server. 

Let's do a thorough update.
sudo apt-get update
sudo apt-get -u upgrade

Step Two—Install MySQL


Once everything is fresh and up to date, we can start to install the server software, beginning with MySQL and dependancies.
sudo apt-get install mysql-server mysql-client php5-mysql

During the installation, MySQL will ask you to set a root password. If you miss the chance to set the password while the program is installing, you can easily create it later within the MySQL shell. 

Step Three—Install nginx


Once MySQL is all set up, we can move on to installing nginx on the VPS.
sudo apt-get install nginx

nginx does not start on its own. To get nginx running, type:
sudo service nginx start

You can confirm that nginx has installed an your web server by directing your browser to your IP address. You can run the following command to reveal your VPS's IP address.
ifconfig eth0 | grep inet | awk '{ print $2 }'

Step Four—Install PHP


To install PHP and PHP-FPM, open terminal and type in these commands. We will configure the details of nginx and php details in the next step:
sudo apt-get install php5 php5-fpm

Step Five—Configure php


We need to make one small change in the php configuration.Open up php.ini:
 sudo nano /etc/php5/fpm/php.ini

Find the line, cgi.fix_pathinfo=1, and change the 1 to 0.
cgi.fix_pathinfo=0
If this number is kept as 1, the php interpreter will do its best to process the file that is as near to the requested file as possible. This is a possible security risk. If this number is set to 0, conversely, the interpreter will only process the exact file path—a much safer alternative. Save and Exit. 

Restart php-fpm:
sudo service php5-fpm restart

Step Six—Configure nginx


Open up the default virtual host file.
sudo nano /etc/nginx/sites-available/default

The configuration should include the changes below (the details of the changes are under the config information):
 [...]
server {
        listen   80; ## listen for ipv4; this line is default and implied
        #listen   [::]:80 default ipv6only=on; ## listen for ipv6

        root /usr/share/nginx/www;
        index index.php index.html index.htm;

        # Make site accessible from http://localhost/
        server_name example.com;

        location / {
                # First attempt to serve request as file, then
                # as directory, then fall back to index.html
                try_files $uri $uri/ /index.html;
                # Uncomment to enable naxsi on this location
                # include /etc/nginx/naxsi.rules
        }

        location /doc/ {
                alias /usr/share/doc/;
                autoindex on;
                allow 127.0.0.1;
                deny all;
        }

        # Only for nginx-naxsi : process denied requests
        #location /RequestDenied {
                # For example, return an error code
                #return 418;
        #}

        #error_page 404 /404.html;

        # redirect server error pages to the static page /50x.html
        #
        #error_page 500 502 503 504 /50x.html;
        #location = /50x.html {
        #       root /usr/share/nginx/www;
        #}

        # pass the PHP scripts to FastCGI server listening on 127.0.0.1:9000
        #
        location ~ \.php$ {
                fastcgi_split_path_info ^(.+\.php)(/.+)$;
                # NOTE: You should have "cgi.fix_pathinfo = 0;" in php.ini

                # With php5-cgi alone:
                fastcgi_pass 127.0.0.1:9000;
                # With php5-fpm:
        #       fastcgi_pass unix:/var/run/php5-fpm.sock;
                fastcgi_index index.php;
                include fastcgi_params;
        }

        # deny access to .htaccess files, if Apache's document root
        # concurs with nginx's one
        #
        location ~ /\.ht {
               deny all;
        }
}
[...]

Here are the details of the changes:

  • Add index.php to the index line.

  • Change the server_name from local host to your domain name or IP address (replace the example.com in the configuration)

  • Uncomment the correct lines in “location ~ \.php$ {“ section

Save and Exit

Step Seven—Create a php Info Page


We can quickly see all of the details of the new php configuration. 

To set this up, first create a new file:
sudo nano /usr/share/nginx/www/info.php

Add in the following line:
<?php
phpinfo();
?>

Then Save and Exit. 

Restart nginx
sudo service nginx restart

You can see the nginx and php-fpm configuration details by visiting http://youripaddress/info.php

Your LEMP stack is now set up and configured on your virtual private server.


우분투 패키지로 phpmyadmin 설치했는데 안 들어가질 때

아마도 아래 명령어로 설치했거나, 시냅틱 패키지 관리자 내지는 우분투 소프트웨어에서 phpmyadmin을 설치했을 것이다.

sudo apt-get install phpmyadmin

그런데 http://localhost/phpmyadmin 으로 들어가지지 않는 경우가 있다.

그럴 때는 아래 명령어로 아파치 설정 파일을 열어서 편집을 해야 한다.

sudo vi /etc/apache2/apache2.conf

그래서 적당한 곳에 아래 설정을 추가한다. (그냥 속편히 맨 아래 넣자.)

# Enable PhpMyAdmin
Include /etc/phpmyadmin/apache.conf

그 후 아파치 재시작

sudo /etc/init.d/apache2 restart


우분투 리눅스에서 APM(Apache+Php+MySQL)을 설치해 보도록 하겠습니다.

이 글은 컴파일해서 쓰는게 아니라 패키지 자체설치로 초보자도 간단하게 설치해볼수 있습니다.

APM이란 리눅스에서 웹서버를 구성할때 많이 쓰는 프로그램의 일반적인 통합명칭입니다.

부르기 쉽게 한데로 모아서 APM이라고 부릅니다. 요즘은 LAMP(Linux + Apache + MySQL + Php/Perl,Python)환경 이라고도 부르기도 합니다.

아파치(Apache)는 웹서버 자체로서 일반적인 프로토콜인 Http프로토콜을 사용합니다. 또한 Https,ftp등도 지원을 하게 됩니다.

MySQL은 데이터베이스 엔진으로서 각종 게시판이나 데이터베이스를 사용해야할때 많이 쓰이는 프로그램입니다. MySQL뿐만 아니라 PostgresSQL도 사용이 가능합니다.

PHP는 스크립트언어로서 웹페이지를 구성할수 있는 언어중 하나입니다. 많은 웹 프로그램들이 php로 작성 되고 있습니다.


일반적으로 설치순서는 Apache -> MySQL -> PHP 등으로 이루어 지게 됩니다.


1) 설치 

1.Apache

먼저 Apache를 설치하여 보겠습니다. 버전은 apache2버전을 기준으로 하겠습니다.

터미널을 열고 다음 명령을 입력합니다.


sudo apt-get install apache2


    다음으로 mysql을 인증을 위한 모듈을 설치하겠습니다.


    sudo apt-get install libapache2-mod-auth-mysql


      다음으로 MySQL


      sudo apt-get install mysql-server mysql-client

        설치가 완료되면 MySQL서버가 자동으로 시작이 됩니다.


        마지막으로 PHP 버전은 PHP5 기준으로 하겠습니다.

        마찬가지로 터미널에서 다음을 입력합니다.

        sudo apt-get install php5-common php5 libapache2-mod-php5

          MySQL과 연동하기 위한 모듈을 설치합니다. 

          sudo apt-get install php5-mysql

            이상으로 설치가 완료 되었습니다.


            아파치 웹서버를 제 시작하겠습니다. 

            sudo /etc/init.d/apache2 restart

              MySQL서버도 정상적으로 작동하는지 확인해 보고 작동을 안한다면 restart 를 해줍니다.

              sudo netstat -tap | grep mysql

              명령을 줬을때 

              tcp 0 0 localhost.localdomain:mysql *:* LISTEN -

              와 비슷한 것을 보면 정상이고 그렇지 않다면

              sudo /etc/init.d/mysql restart

              로 재시작을 해줍니다.


              모든게 정상이라면

              에디터를 열고 웹서버의 디렉토리(일반적으로 "/var/www" 에서 phpinfo.php라는 파일을 만들고 다음의 소스코드를 넣어 줍니다.

              1. <?php
              2. print_r(phpinfo());
              3. ?>

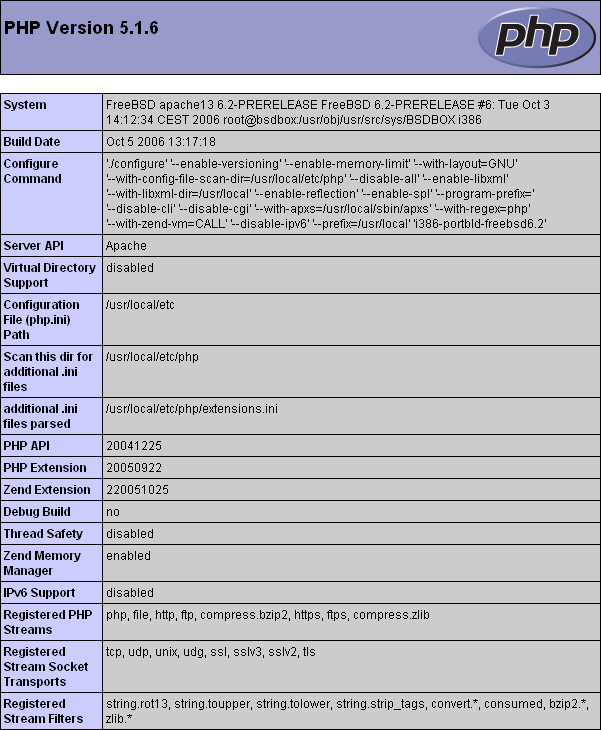
              그리고 웹브라우저를 열고 실행을 시켜봅니다.


              일반적으로 http://호스트주소/phpinfo.php 로 주소를 열면 됩니다.


              다음과 같은 화면이 나오면 웹서버를 위한 환경이 구성이 되었습니다.

              스크롤을 내려 Apache 와 MySQL 등을 찾아 제대로 연결이 되었는지 확인해 봅니다.

              각종 사항은 설정마다 다르게 나올것입니다.
               

              사용자 삽입 이미지

              phpinfo


              phpinfo.png

              2) 설정

              1. 아파치 

              아파치의 기본설정 파일은 /etc/apache2/apache2.conf

              포트번호, 문서의루트, 모듈, 각종 로그파일, 가상 호스트 등을 설정할수 있습니다.

              자세한 사항은 아파치 문서를 참조하시기 바랍니다.


              2.  MySQL

              mysql 의 관리자 암호는 처음에는 지정이 되지 않은 상태입니다.

              관리자 암호를 설정하기 위해서는 

              sudo mysqladmin -u root password newrootsqlpassword 

              sudo mysqladmin -p -u root -h localohost password newrootpassword

                을 입력합니다.

                첫번째 줄만 실행해도 설정은 될것입니다.

                MySQL 설정파일은 /etc/mysql/my.cnf 파일이고 로그 파일, 포트 번호등을 설정할수 있습니다.


                이상으로 훌륭한 웹서버 환경을 구축하게 되었습니다.

                처음 시작이니 만큼 보다 많은 노력과 시간을 들이는게 중요하다고 봅니다.

                여러 문서를 참조하여 실력을 쌓으시길 바랍니다. 행운을 빕니다~ 


                + Recent posts