1. Ubuntu Nginx, Php5 세팅해주는 과정에서 오류가 발생


$sudo nano /etc/nginx/sites-available/default

.

.

...


         location ~ \.php$ {

                try_files $uri =404;

                fastcgi_split_path_info ^(.+\.php)(/.+)$;

        #       # NOTE: You should have "cgi.fix_pathinfo = 0;" in php.ini

        #

        #       # With php5-cgi alone:

                 fastcgi_pass 127.0.0.1:9000;

        #       # With php5-fpm:

                fastcgi_pass unix:/var/run/php5-fpm.sock;

                fastcgi_index index.php;

                include fastcgi_params;

        }

이렇게 세팅을 해줬더니 502 Bad GateWay 오류가 났다.

로그를 찍어보니

$ nginx -t

nginx: [warn] server name "http://bobss.tk" has suspicious symbols in /etc/nginx/sites-enabled/default:28

nginx: [emerg] "fastcgi_pass" directive is duplicate in /etc/nginx/sites-enabled/default:58

nginx: configuration file /etc/nginx/nginx.conf test failed

default파일에서 오류가 발생해서 검색해보니


" The location block provided results in error: nginx: [emerg] unknown directive "fast_cgi_split_path_info" in /etc/nginx/sites-enabled/default:56 Need to remove the underscore between fast and cgi: fastcgi_split_path_info ^(.+\.php)(/.+)$; "

Then comment the first case with php5-cgi alone since php5-fpm is already installed.
I came with the same problem. Hope this could help you.

.

.

...


         location ~ \.php$ {

                try_files $uri =404;

                fastcgi_split_path_info ^(.+\.php)(/.+)$;

        #       # NOTE: You should have "cgi.fix_pathinfo = 0;" in php.ini

        #

        #       # With php5-cgi alone:

        #        fastcgi_pass 127.0.0.1:9000;

        #       # With php5-fpm:

                fastcgi_pass unix:/var/run/php5-fpm.sock;

                fastcgi_index index.php;

                include fastcgi_params;

        }

php5-fpm와 cgi 가 중복된다는 뜻인것같아 주석처리후 재시작 했더니 해결


php 파일 업로드 사이즈는 기본적인  php.ini 수정하여 되었다

(http://jasontody.tistory.com/65 참고)


그런데.. 


추가적으로 해줘야 될 사항들.

(용량을 크게 늘린다던지 등..)


[ /etc/php5/fpm/php.ini ]

1. file_uploads = On
2. upload_max_filesize 10M
3. post_max_size 10M
4. max_input_time 300
5. max_execution_time 300
6. memory_limit 128M

* post_max_size > upload_max_filesize 
[ /etc/nginx/sites-available/default ]
1. client_max_body_size 100M


contact_me.php


<?php

// check if fields passed are empty

if(empty($_POST['name'])   ||

   empty($_POST['email']) ||

   empty($_POST['message']) ||

   !filter_var($_POST['email'],FILTER_VALIDATE_EMAIL))

   {

echo "No arguments Provided!";

return false;

   }

$name = $_POST['name'];

$email_address = $_POST['email'];

$message = $_POST['message'];

// create email body and send it

$to = 'jasontody@gmail.com'; // hi mate thanks for purchase guna theme, just replace your email with emailme@myprogrammingblog.com

$email_subject = "Contact form submitted by:  $name";

$email_body = "You have received a new message. \n\n".

 " Here are the details:\n \nName: $name \n ".

 "Email: $email_address\n Message \n $message";

$headers = "From: 3layerglass@contact-3layerglass.com\n";

$headers .= "Reply-To: $email_address";

mail($to,$email_subject,$email_body,$headers);

return true;

?>


했는데 메일이 가지않는문제발생


 sudo apt-get install sendmail


5
Indeed, the steps I took were 1) If sendmail isn't installed, install it: apt-get install sendmail 2) Configure hosts file correctly: nano /etc/hosts And make sure the line looks like this: 127.0.0.1 localhost localhost.localdomain yourhostnamehere 3) Run the sendmail config and answer 'Y' to everything: sendmailconfig I restarted apache for good measure: service apache2 restart After that my mail was sending instantly.


그다음


sudo sendmailconfig


## REWRITE URL ###

         rewrite ^/pricing.Aloha$ /pricing.html;

        rewrite ^/en/pricing.Aloha$ /en/pricing.html;

        rewrite ^/$ /index.html;

        rewrite ^/en/$ /en/index.html;

        rewrite ^/about.Aloha$ /about.html;

        rewrite ^/en/about.Aloha$ /en/about.html;

        rewrite ^/contact.Aloha$ /contact.html;

        rewrite ^/en/contact.Aloha$ /en/contact.html;

        rewrite ^/facility.Aloha$ /facility.html;

        rewrite ^/en/facility.Aloha$ /en/facility.html;

        rewrite ^/faq.Aloha$ /faq.html;

        rewrite ^/en/faq.Aloha$ /en/faq.html;


/etc/nginx/sites-available/default 파일 내


server{


}

안에 수정해주면됨 

서브도메인을 하기 위해 찾아보다가... 나중에 또 까먹을거같아서 대략적으로 정리

막상 찾아보니 어렵진 않다....


1. Ubuntu /etc/nginx/sites-available/default 파일 수정


$ sudo
nano /etc/nginx/sites-available/default
server{

listen 80;

listen [::]:80; #서버 기본세팅을 해주었기 때문에 (위쪽) 중복으로 ipv6, default_server와같은 세팅X


root /home/경로

index index.php index.html index.htm


#Make site accessible from http://localhost/

server_name sub.domain.com;

}


$ sudo service nginx restart


2. Creating or pointing domains/subdomains to the server's ip address.

Go to your domain register or to the DNS where your domain records are stored and point them to your server ip address (you can do this with a subdomain too). If you are trying this locally modify the "/etc/hosts" files and create a new record.

$ sudo nano /etc/hosts

And add something like.

127.0.0.1    example.com
127.0.0.1    example2.com
127.0.0.1    my.example.com


3. DigitalOcean(내가 쓰는 서버 호스팅) 에서 DNS 세팅 - CNAME 설정


참고 : http://albertogrespan.com/blog/running-multiple-domains-or-subdomains-in-nginx-with-server-blocks/

1. 서버구매


2. ID/PW 세팅.


 - 아이디 생성 및 관리자권한 부여 (http://jasontody.tistory.com/180)

 - $sudo adduser [userid]

 - $sudo visudo 

$sudo adduser [userid] $sudo visudo


/etc/sudoers 파일 내


# ...

# #User privilege specification

# root ALL=(ALL:ALL) ALL

# [userid] ALL=(ALL:ALL) ALL

저장 후

$sudo reboot

후에 로그인


3. Nginx / Php / Mysql(Mariadb) 설치(http://jasontody.tistory.com/41)

  * Ubuntu 16.04 에서는 php5가아닌 php7.0-fpm 으로 설치해야한다

$sudo apt-get install nginx

$sudo apt-get install php7.0-fpm // 설치시에 mycrypt 도 자동설치된다

$sudo apt-get install php7.0-gd php7.0-curl php7.0-mbstring // 많이쓰이는 모듈 설치

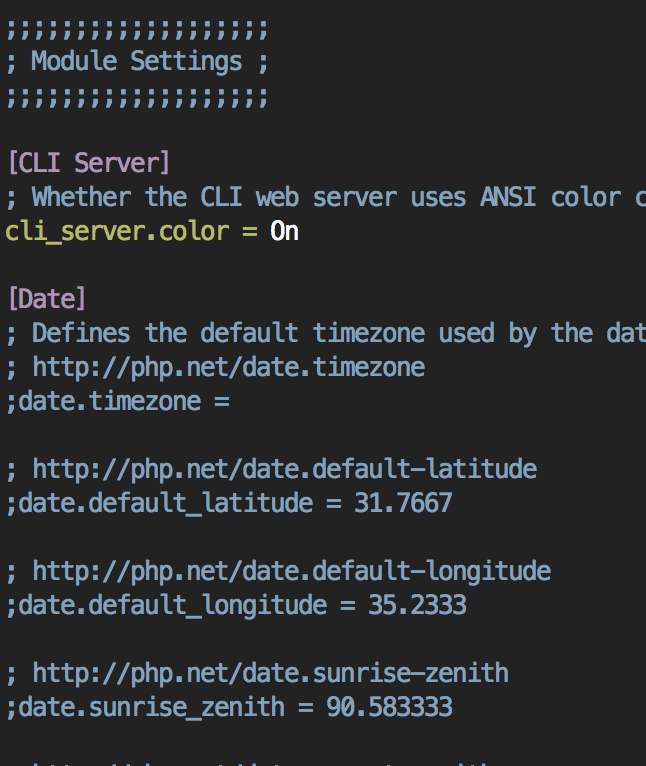
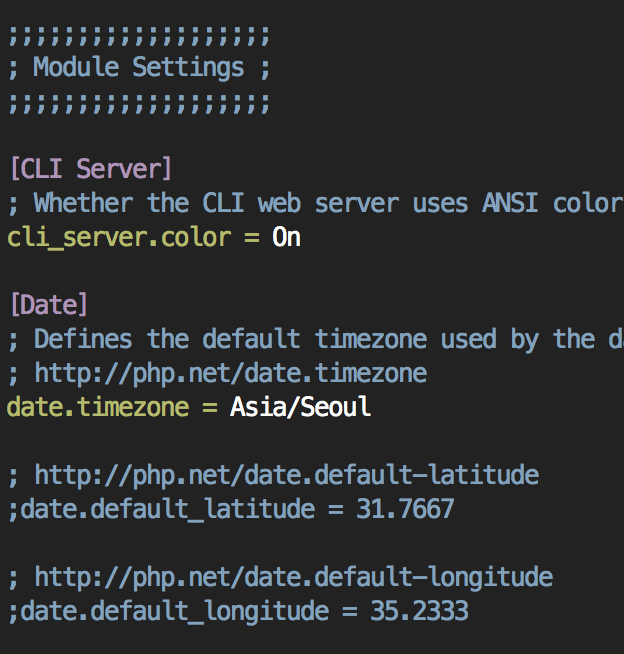
 타임존 세팅(권장사항, 이작업 하지 않을 시 시스템 타임존 설정으로 적용)

$sudo nano /etc/php/7.0/fpm/php.ini

$sudo nano /etc/php/7.0/cli/php.ini

date.timezone 값을 찾아서 주석을 제거하고 시간을 설정(출처 : https://blog.lael.be/post/2600)

k21

이 값을 찾아

k22

이렇게 변경, 저장 후 php 재시작

$sudo service php7.0-fpm restart

$sudo apt-get install mariadb-server

또는

$sudo apt-get install mariadb-server-10.1 mariadb-client-10.1

$sudo apt-get install php7.0-mysql // php5일경우 apt-get install php5-mysql 로 설치


4. Xe 다운 및 GD 라이브러리 설치

  1) git 설치(sudo apt-get install git)

$sudo apt-get install git

$git clone https://github.com/xpressengine/xe-core

 2)GD 라이브러리 설치(for Rewrite) / 링크(http://jasontody.tistory.com/41)

$sudo apt-get install php5-gd

$sudo /etc/init.d/nginx restart 또는 $sudo service nginx restart

$reboot


5. Xe Rewrite

 - http://jasontody.tistory.com/entry/Xpress-engine-nginx-rewrite-%EC%84%A4%EC%A0%95-%EC%A7%A7%EC%9D%80%EC%A3%BC%EC%86%8C-xpressengine-222222


Digital Ocean 이용중인데,  FTP 는 접속은 되나  맥에서 SSH 접속은 안되는 문제 발생


Ssh a@host 하면

connection Closed by 0.0.0.0(ip) 라는 메세지와 접속이 안됨


재부팅하니 해결은 됐으나 DigitalOcean에 해결법이 있어 메모


DigitalOcean - 계정 - Web Console 에서 해결


Log in to your droplet via the console and run these commands:
ssh-keygen -t dsa -N "" -f /etc/ssh/ssh_host_dsa_key
ssh-keygen -t rsa -N "" -f /etc/ssh/ssh_host_rsa_key
ssh-keygen -t ecdsa -N "" -f /etc/ssh/ssh_host_ecdsa_key
if that doesn't work (i.e. you still can't type /), try running this command instead:
dpkg-reconfigure openssh-server


출처 : https://www.digitalocean.com/community/questions/ssh_exchange_identification-connection-closed-by-remote-host


$sudo vi /etc/nginx/sites-available/default 


에서


# fastcgi_pass 127.0.0.1:9000

fastcgi_pass unix:/var/run/php5-fpm.sock;


Nginx rewite 설정하기

sungbum hong edited this page  · 7 revisions

이 페이지에서는 Nginx에 XE를 설치할 경우, rewrite 설정 방법에 대하여 설명합니다.

개요

XE에서는 짧은주소의 사용을 위하여 rewrite rule을 사용하고 있습니다. 웹서버로 apache를 사용할 경우, apache의 rewrite_mod와 .htaccess 파일을 사용하여 rewrite를 구동시킵니다. 하지만 웹서버가 Nginx일 경우에는, rewrite를 위하여 별도의 설정이 필요합니다.

설정 방법

설정방법은 크게 두가지 과정을 거칩니다.

  1. xe를 위한 rewrite rule이 기록된 xe_rewrite.conf 파일을 작성
  2. nginx의 설정파일인 nginx.conf 파일에 새로 작성한 xe_rewrite.conf 파일을 include하기

xe_rewrite.conf 작성하기

nginx의 conf 디렉토리로 이동합니다.
(NGINX_DIR은 실제 자신의 서버에 nginx가 설치된 디렉토리 경로로 치환해야 합니다.)

# cd NGINX_DIR/conf

xe_rewrite.conf 파일을 새로 작성합니다.

# pwd
NGINX_DIR/conf
# vi xe_rewrite.conf

xe_rewrite.conf 파일의 편집기에서 아래의 내용을 붙여넣습니다.

# reserve XE Layout Template Source File (*.html)
rewrite ^/(layouts|m.layouts)/(.+)/(.+).html$ /index.php last;

# conf, query, schema
rewrite ^/(modules|addons|widgets)/(.+)/(conf|queries|schemas)/(.+).xml$ /index.php last;

# static files
rewrite ^/(.+)/files/(member_extra_info|attach|cache|faceOff)/(.*) /files/$2/$3 last;
rewrite ^/(.+)/(files|modules|widgets|widgetstyles|layouts|m.layouts|addons)/(.*) /$2/$3 last;

# rss, blogAPI
rewrite ^/(rss|atom)$ /index.php?module=rss&act=$1 last;
rewrite ^/([a-zA-Z0-9_]+)/(rss|atom|api)$ /index.php?mid=$1&act=$2 last;
rewrite ^/([a-zA-Z0-9_]+)/([a-zA-Z0-9_]+)/(rss|atom|api)$ /index.php?vid=$1&mid=$2&act=$3 last;

# trackback
rewrite ^/([0-9]+)/(.+)/trackback$ /index.php?document_srl=$1&key=$2&act=trackback last;
rewrite ^/([a-zA-Z0-9_]+)/([0-9]+)/(.+)/trackback$ /index.php?vid=$1&document_srl=$2&key=$3&act=trackback last;

# administrator page
rewrite ^/admin/?$ /index.php?module=admin last;

# document permanent link
rewrite ^/([0-9]+)$ /index.php?document_srl=$1 last;

# mid link
rewrite ^/([a-zA-Z0-9_]+)/?$ /index.php?mid=$1 last;

# mid + document link
rewrite ^/([a-zA-Z0-9_]+)/([0-9]+)$ /index.php?mid=$1&document_srl=$2 last;

# vid + mid link
rewrite ^/([a-zA-Z0-9_]+)/([a-zA-Z0-9_]+)/?$ /index.php?vid=$1&mid=$2 last;

# vid + mid + document link
rewrite ^/([a-zA-Z0-9_]+)/([a-zA-Z0-9_]+)/([0-9]+)$ /index.php?vid=$1&mid=$2&document_srl=$3 last;

# mid + entry title
rewrite ^/([a-zA-Z0-9_]+)/entry/(.+)$ /index.php?mid=$1&entry=$2 last;

# vid + mid + entry title
rewrite ^/([a-zA-Z0-9_]+)/([a-zA-Z0-9_]+)/entry/(.+)$ /index.php?vid=$1&mid=$2&entry=$3 last;

nginx.conf 수정하기

nginx.conf 파일을 편집기로 엽니다.

# pwd
NGINX_DIR/conf
# vi nginx.conf

nginx.conf를 아래와 같이 수정합니다.

http {
    include       mime.types;
    default_type  application/octet-stream;

    ....중략....

    server {
        listen      80;
        server_name  www.mydomain.com;
        root /home/public_html;
        index index.php;

        ....중략 ....

        # xe rewrite 적용하기
        include xe-rewrite.conf;
    }
}

위의 코드에서 봐야할 설정은 include xe-rewrite.conf입니다. xe 사이트에 대해 설정되어 있는 server 항목 안에 include xe-rewrite.conf; 코드가 위치하면 됩니다.

nginx 재시작

nginx를 재시작합니다.

# sudo service nginx restart

다시 XE를 설치를 진행합니다. 설치 진행 과정에서 짧은 주소에 관한 안내가 나타나지 않는다면, 짧은 주소를 정상적으로 사용할 수 있습니다.


출처 : https://github.com/xpressengine/xe-core/wiki/Nginx-rewite-%EC%84%A4%EC%A0%95%ED%95%98%EA%B8%B0


리눅스 운영체제는 유닉스 시스템을 기반으로 하고 있으며, 기본적으로 운영체제가 부팅될 때,

'로그인'이라는 과정을 진행하게 됩니다. 


로그인 과정은 user ID 즉, 계정 이름과 비밀번호를 요구합니다. 

오늘은 user ID를 생성하는 방법

계정에 sudo 권한을 부여하는 방법에 대해서 설명하겠습니다.


1. user ID 생성

1
$ sudo adduser [userid]            // 사용자 계정을 새로 만드는 명령어

[userid]는 생성하고자 하는 user id 값입니다.

가령, jeongmin 이라는 계정을 추가하고 싶다면

$ sudo adduser jeongmin

이렇게 사용하시면 됩니다.


2. 계정에 sudo 권한 부여하기

 우선, sudo 권한이 무엇인지 부터 알려드려야 겠네요.

리눅스 운영체제를 사용해보신 적 있다면 sudo apt-get install... 등 과 같이 sudo 명령어를

은근히 몇 번 써보셨을 겁니다. sudo 명령어는 사용자에게 루트 권한을 부여하는 것입니다.


리눅스 운영체제에서는 일부 중요한 데이터나 시스템을 변경하는 등의

책임이 큰 행동에 대해서는 루트 권한을 요구합니다. 

쉽게 생각해서 루트 권한을 뭐든지 할 수 있는 슈퍼 유저라고 생각하십시오.


그리고 일반 사용자가 잠시동안 루트 권한을 빌리는 방법이 바로 sudo 명령어를 사용하는 것입니다.

그런데 아무 사용자나 sudo 명령어를 쓸 수 있다면 굳이 sudo 명령어가 필요하겠습니까?

일반 사용자도 sudo 명령어를 쓸 수 있는 계정/ 쓸 수 없는 계정이 있습니다.


한 사용자 계정이 sudo 권한을 부여 받으려면 /etc/sudoers 파일 안에 등록이 되어야 합니다.

다음 명령어를 입력해봅시다.

1
$ sudo visudo                         // /etc/sudoers 에 접근


/etc/sudoers 파일 내에서

....

# User privilege specification

root ALL=(ALL:ALL) ALL

....

이 곳에 

[userid] ALL=(ALL:ALL) ALL                // [userid] 는 권한을 부여하고자 하는 계정 이름.

을 추가하시면 됩니다.


후 재시작 고고


출처 : http://thinkpro.tistory.com/16

+ Recent posts