https://m.blog.naver.com/metooneis/221205368477
'공부 > 맥|OSX' 카테고리의 다른 글
| [펌]nwjs를 통한 하이브리드 데스크탑 어플리케이션 만들기 (0) | 2016.12.19 |
|---|---|
| 맥 파인더(Finder)와 서버 연결 (0) | 2013.08.12 |
| 맥 OSX 에서 NDK PATH설정하기 (0) | 2013.08.02 |
https://m.blog.naver.com/metooneis/221205368477
| [펌]nwjs를 통한 하이브리드 데스크탑 어플리케이션 만들기 (0) | 2016.12.19 |
|---|---|
| 맥 파인더(Finder)와 서버 연결 (0) | 2013.08.12 |
| 맥 OSX 에서 NDK PATH설정하기 (0) | 2013.08.02 |
많이 찾아봤지만 되는 방법은 결국 여기서 찾았따
출처 :https://m.blog.naver.com/catstar9898/220804915390
서버를 열고싶은데..
저희집 와이파이 기종이 kt에요ㅠㅠ
저희집은 olleh에요..ㅠㅠ
서버를 열고싶은데 어떻게열어요?
그런 kt,올레 마크유저들을 위한 강좌 시작합니다!
2017.07.06(월)
올레 포트포워딩이 여러차례 바뀐탓에
수정하였습니다. 올레와이파이 유저분들은
아래로 쭉 스크롤 내리셔서 나오는 영상을 참고하여주세요
MINECRAFT
~kt,olleh 포트포워딩법~
먼저 포트포워딩을 하기위해서는
외부아이피와 내부아이피
이 두가지가 필요합니다!
먼저 외부아이피를 확인해볼까요?
먼저 인터넷에 들어가 초록검색창을 띄워줍니다
여기에다가
내ip확인
이렇게 입력해서 검색해주면
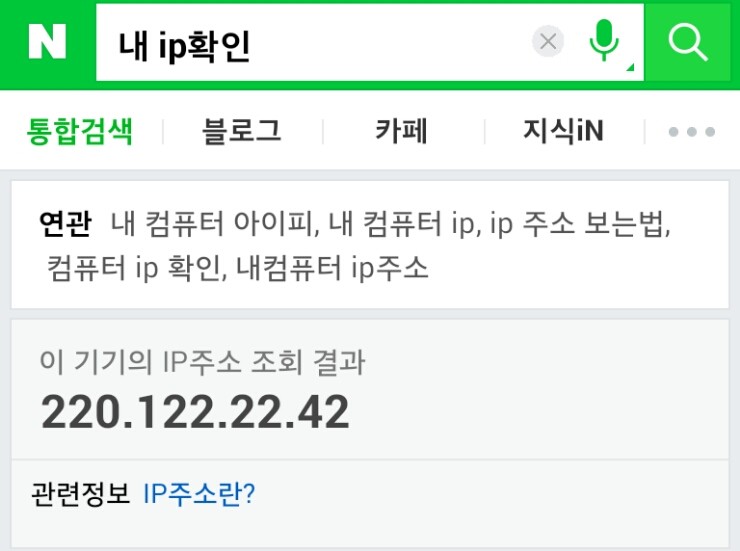
이렇게 외부아이피가 뜹니다!
이 외부아이피를 기억해 놓으세요
그 다음은 내부아이피 확인입니다
많은사람들이 어플을깔아서 확인하려하죠
꼭 어플을 설치하지 않아도 되는데 말이죠..
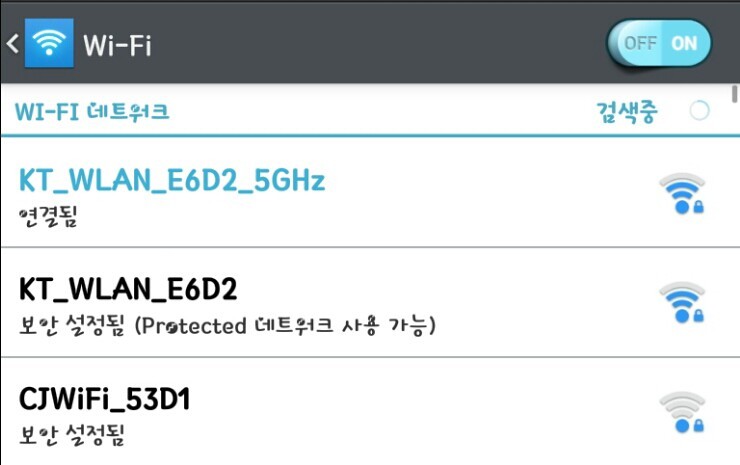
설정에서 와이파이로 들어가봅시다!
그럼 위 사진처럼 내가 접속한 와이파이가 뜨죠?
내가 접속한 와이파이를 터치하면
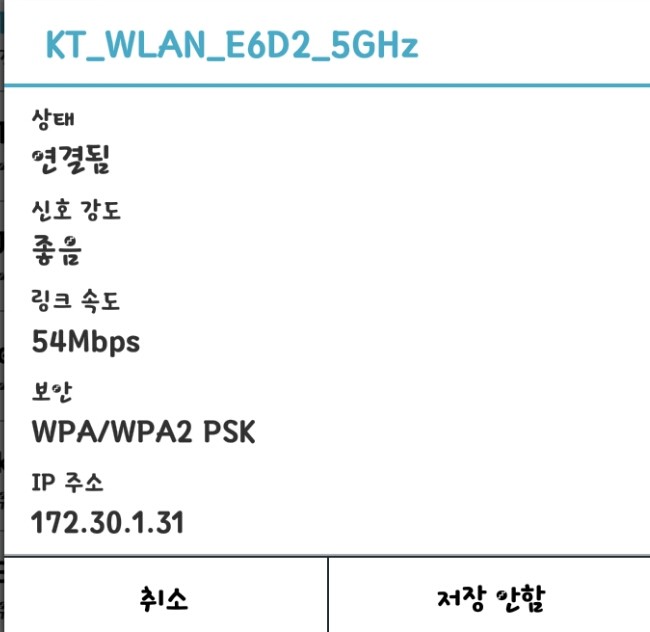
위 사진처럼 정보가 뜹니다
맨 아래의 ip주소를 기억하세요
당신의 내부아이피 주소랍니다!
그럼 외부.내부아이피가 준비되었으니
포트포워딩을 해볼까요?
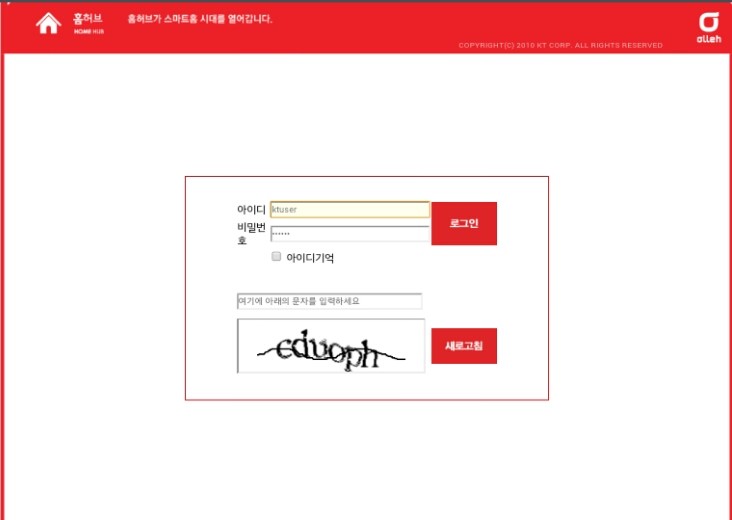
http://172.30.1.254/login.asp
이 주소가 포트포워딩을 하기위한사이트입니다
주소를 복사하여 인터넷에서 복붙하여 사이트로 들어가볼까요?
하지만 그들은 우리가
쉽게 포포하는걸 허락하지않지

비밀번호 입력 개귀찮앙
kt유저
아이디:ktuser
비밀번호:megaap
olleh유저
아이디:ktuser
비밀번호:homehub
그리고 보안키를 입력하고 로그인하시면
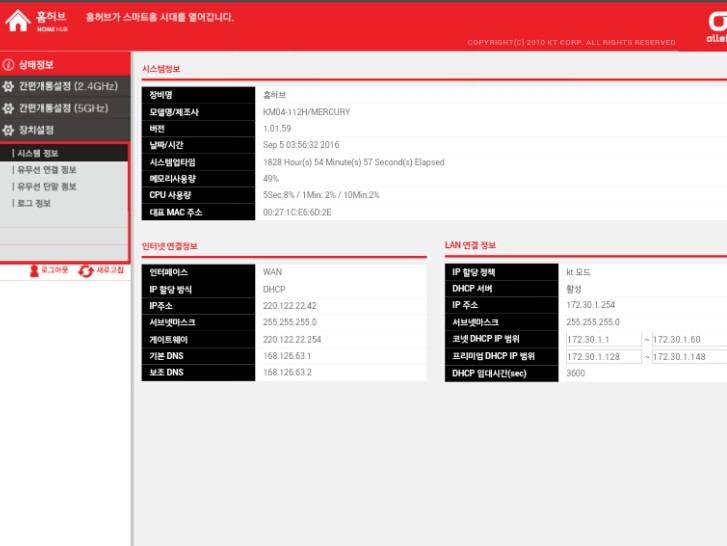
사이트 로그인 성공!
이렇게 메인화면이 뜰거랍니다
왼쪽에 보면 창이 있는데
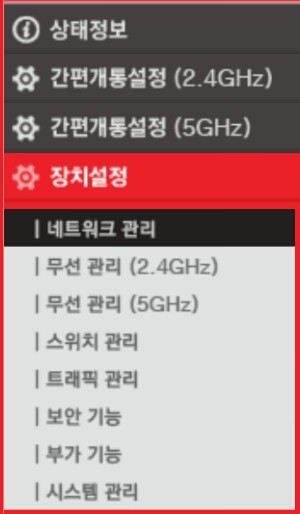
장치설정->트래픽관리
이렇게 이동해주세요
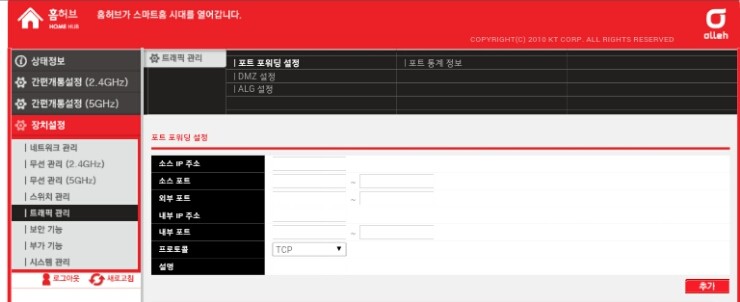
그럼 이렇게 생긴 곳으로 이동이 되는데요
여기서 포트포워딩을 할겁니다!
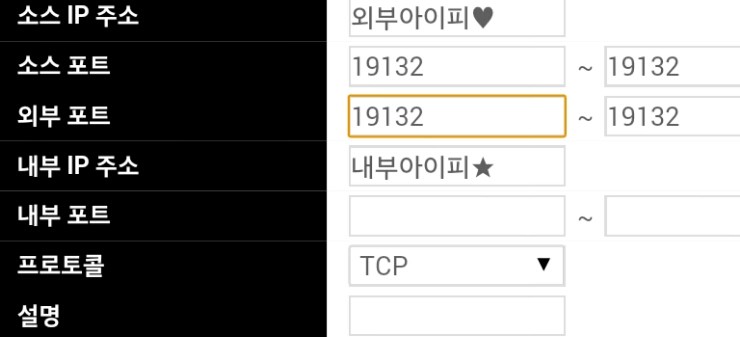
맨 위의 칸에는 아까 인터넷에서 찾은
외부아이피를 입력
소스포트와 외부포트는
전부 19132로 입력해주세요
내부IP주소에는
아까 와이파이에서 확인한
내부아이피를 입력
내부포트는
마찬가지로19132
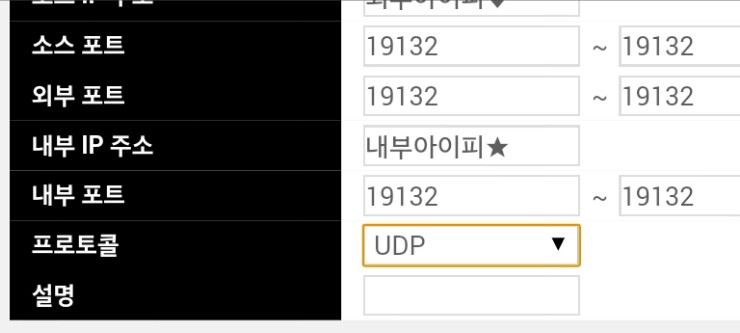
프로토콜에서는
kt와 올레는 유동성 아이피입니다
그러니 UDP로 바꿔주세요

유동성이라서 내부아이피가 매일 바뀌기에
자주 포트포워딩을 해야하는 깊은 빡침
설명은 아무거나 해도 좋아요:)
그리고 저장하기를 눌러주세요
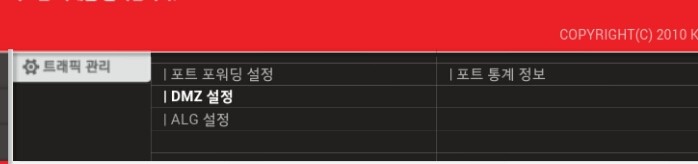
아까 위에서 이런 창이 있었죠?
이제 DMZ설정으로 이동해주세요!
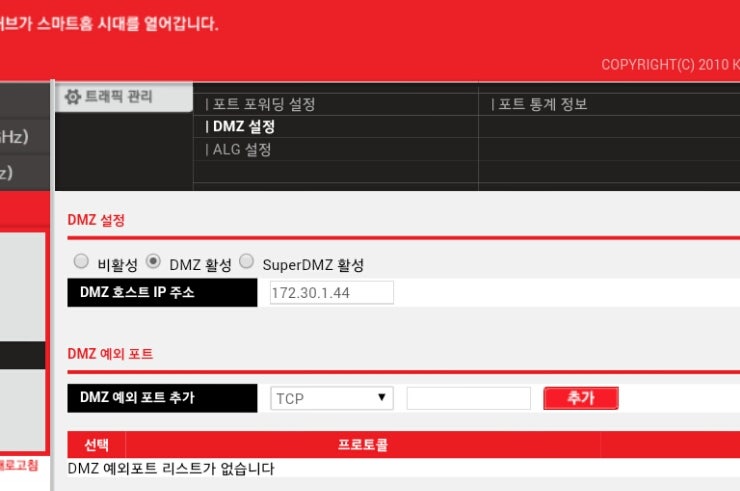
그럼 이렇게 생긴 창이 뜹니다!
여기서 DMZ호스트 IP주소에
내부아이피를 입력해주세요!
그리고 설정하기를 눌러주시면
포트포워딩이 끝난답니다!
-----------------------
2017.08.07(월) 3차수정
올레 포트포워딩 방법(영상)
포트포워딩 방법이 다시 바뀌었던걸 모르고있었습니다.
정보수집이 부족했던점 죄송합니다..
영상은 친구님이 직접 찍어주셨습니다댓가는 피시방비용
KT포트포워딩 방법(영상)
이건 좀 더 이해하실수 있도록 찍은 영상
블로거가 멍청해서 약간 헤매는점은 양해부탁드려요
------------------------
※
서버를 열고자 할때
서버에 들어올 사람들에게
외부아이피를 알려주셔야 합니다!
그리고 서버온의 여부를 알려주고
마인크래프트에 들어가 아무 맵에나 들어가있으면
곧 사람들이 입장한답니다!
처음으로 해본 강좌라 그런지
많이 어색하고 그렇네요0w0
무엇보다 설명을 제대로 했을까..듀근두근
kt와 올레유저분들
이 글 보시고 포포에 도움되길 바랄게요:)
늦은 수정과 정보에 죄송합니다..!!
더욱더 노력해보이겠습니다!
첫번째 강좌는 여기서 끝!
| 와이어프레임, 스토리보드, 프로토토타입 차이점 (0) | 2019.03.11 |
|---|---|
| ftp 533 error (0) | 2018.12.08 |
| [펌]혼자서 법인만들기 – 2편 사업자등록 (0) | 2016.12.19 |
| [펌]혼자서 법인만들기 – 1편 법인등기 (0) | 2016.12.19 |
| [SlideShare](메모) 나는 개발잔데 왜 자신이없을까? (0) | 2013.10.21 |
구글의 공식 도움말(한글)이 잘돼있어서 참고용으로 작성
출처 : https://support.google.com/adsense#topic=3373519
| 체크박스 / 라디오 배경 변경, 꾸미기 (0) | 2019.08.12 |
|---|---|
| 순수 HTML/CSS Carousel (0) | 2019.04.11 |
| [펌]CSS 선택자(Selector)의 종류 및 간단한 효과주기 (0) | 2013.06.03 |
| Float된 요소 가운데정렬 시키기 (0) | 2013.05.21 |
| 모바일에서 웹페이지 접속시, 모바일 전용 페이지로 이동하기 (0) | 2013.01.14 |
define('WP_ALLOW_MULTISITE', true);2. wp관리자 로그인 - 도구 - 네트워크 설정 중 wp-config.php 파일 내 수정코드 수정
define('MULTISITE', true);
define('SUBDOMAIN_INSTALL', true);
define('DOMAIN_CURRENT_SITE', 'examplewp.com');
define('PATH_CURRENT_SITE', '/');
define('SITE_ID_CURRENT_SITE', 1); WordPress's multisite feature offers the ability to create multiple websites from a single installation of WordPress. Each site can have a separate theme, set of plugins, and collection of content (posts and pages). This reduces the overhead of maintaining and updating several installations of WordPress, while allowing you to host multiple sites which are totally unrelated to one another.
WordPress multisite comes in two flavours: subdirectory or subdomain. In this tutorial, we will set up WordPress multisite to use subdomains. That means that sites we create will have a subdomain web address like http://wp-site.yourdomain.com. This can be mapped to an external domain like http://wp-site.net so that each site looks independent from the outside.
This tutorial requires the user to have a knowledge of the following:
We will be creating three WordPress sites with the following domain names:
Site 1:
Domain: examplewp.com (Primary domain)
This is the site that is created when WordPress is installed.
Site 2:
External Domain: shoppingsite.com
Subdomain: shoppingsite.example.com
Site 3:
External Domain: companysite.org
Subdomain: companysite.example.com
The first domain is the primary domain name through which WordPress will be installed. Make sure to set up DNS for all three domains to point to the IP address of the Droplet which will host WordPress.
In this section, we will add a DNS wildcard record for the primary domain so that more sites can be added at any time, without needing individual A records. (Alternately, you can add a new A record for each subdomain.)
Note: This has to be done only for the *primary domain (examplewp.comin this tutorial).
Log in to your DigitalOcean control panel and navigate to the Networking section. Edit the primary domain and create a wildcard A record for this domain pointing to the Droplet's IP address. A wildcard record is created by entering an asterisk (*) in the hostname input box as shown in the screenshot below.
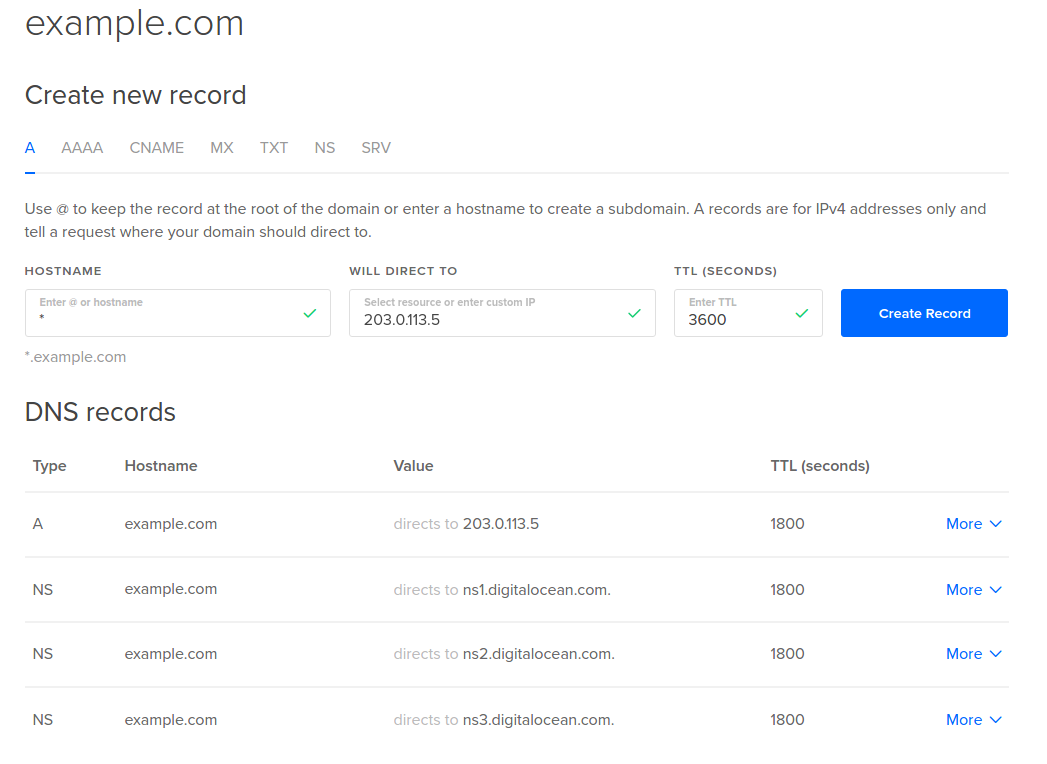
If you host your domain's DNS elsewhere, you should set the wildcard record there instead.
What you should see now:
DNS queries for any random-sub-domain.examplewp.com should return the IP address of your Droplet.
In this section, we will install and configure Nginx, MySQL, and PHP. There is a detailed article on setting up a LEMP stack that you can reference if you would like to. This section will serve as a quick setup. There is also a LEMP on Ubuntu 14.04 image under the Applications tab in the Select Image section when creating a Droplet.
Update the repositories and install Nginx, MySQL, PHP5-FPM and other necessary PHP modules.
apt-get update
apt-get install -y nginx mysql-server php5-fpm php5-mysql php5-curl php5-mcrypt php5-gd
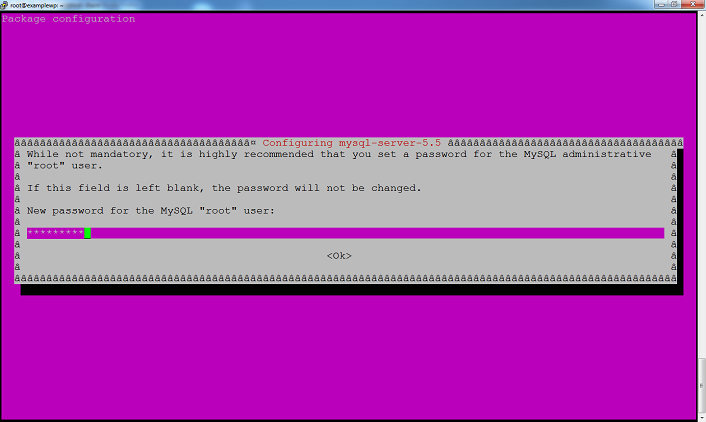
When MySQL server is being installed, you will be prompted to enter a password for the root database user. Please enter a strong password and do not leave it blank. You will enter the password twice.
Create a document root for Nginx which will hold the WordPress files. We will use /usr/share/nginx/wordpress throughout this tutorial.
mkdir /usr/share/nginx/wordpress
We will replace Nginx's default virtual host with our own, so remove its symlink in the sites-enableddirectory.
rm /etc/nginx/sites-enabled/default
Create a new virtual host file inside the sites-available directory. This file can be named anything. In our example, we will call it wp-ms.
nano /etc/nginx/sites-available/wp-ms
Edit this file and place the following configuration. Edit the text highlighted in red according to your environment. In the server_name line, you should add all three (or more) of your multisite domains, and the wildcard subdomain for the first domain.
server {
    listen [::]:80 ipv6only=off;
    server_name examplewp.com *.examplewp.com shoppingsite.com companysite.org;

    root /usr/share/nginx/wordpress;
    index index.php index.html index.htm;

    location / {
        try_files $uri $uri/ /index.php?$args ;
    }

    location ~ /favicon.ico {
        access_log off;
        log_not_found off;
    }

    location ~ \.php$ {
        try_files $uri /index.php;
        include fastcgi_params;
        fastcgi_pass unix:/var/run/php5-fpm.sock;
    }

    access_log  /var/log/nginx/$host-access.log;
    error_log   /var/log/nginx/wpms-error.log;
}
If this Droplet will host only this WordPress installation, the listen and server_name directives can be changed to the following:
listen [::]:80 default_server ipv6only=off;
server_name examplewp.com *.examplewp.com;
The use of the $host variable in the access_log directive creates separate log files for each domain like examplewp.com-access.log and shoppingsite.com-access.log. It is not possible to use such variables for the error_log directive, so all errors are logged in a single file.
Save this file and create a symlink of this file inside the sites-enabled directory.
ln -s /etc/nginx/sites-available/wp-ms /etc/nginx/sites-enabled/wp-ms
Execute an Nginx configuration test and restart if it returns OK.
service nginx configtest
service nginx restart
In this section, we will create a MySQL database for WordPress and a user with permissions for this database only.
Log in to the MySQL command line as the root user.
mysql -u root -p
Create a database.
CREATE DATABASE wordpress;
Create a MySQL user and grant permissions to this database:
CREATE USER 'wordpress_user'@'localhost' IDENTIFIED BY 'password';
GRANT ALL PRIVILEGES ON wordpress.* TO 'wordpress_user'@'localhost';
Replace the word password with a strong password. Flush the privileges and exit the MySQL command line.
FLUSH PRIVILEGES;
exit
Note down these details as will be needing them in Step Four.
Database Name: wordpress
Database User: wordpress_user
Database Password: password
More information about MySQL users can be found in this article.
In this section, we will download the latest version of WordPress and install it. This will be for our first site, examplewp.com.
Download and extract WordPress.
wget http://wordpress.org/latest.tar.gz
tar -xf latest.tar.gz
Move the extracted files into the document root.
mv wordpress/* /usr/share/nginx/wordpress/
Assign ownership to the user www-data. This is essential for media uploads and for core/plugin/theme updates to work in WordPress.
chown -R www-data:www-data /usr/share/nginx/wordpress
Access the primary domain in your browser to begin the WordPress installation.
http://examplewp.com/
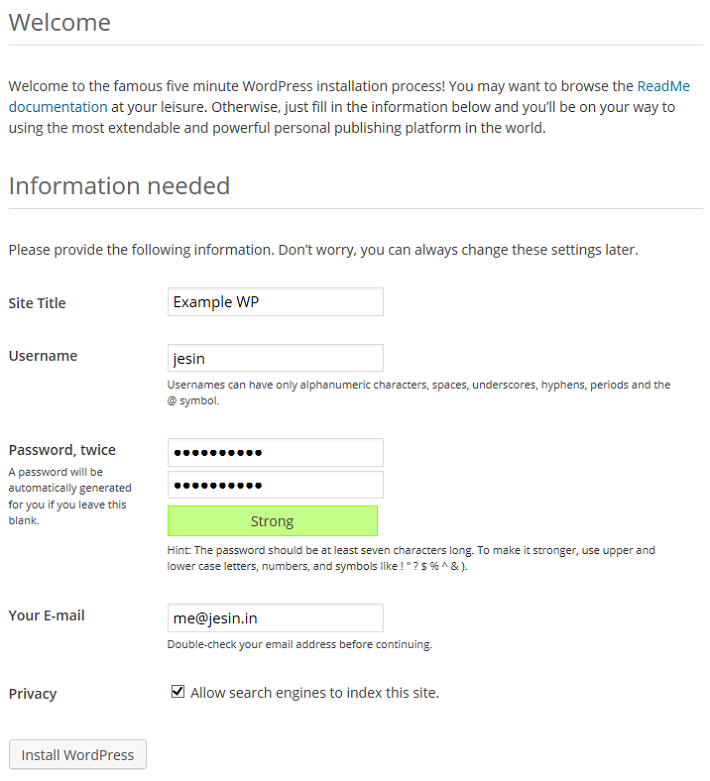
You can add the "www" suffix to the URL if needed. Click the Create a Configuration File button followed by the Let's go! button. Fill in the database details (use the information from Step Three) and click Submit.

At this point, WordPress will establish a connection with the database to test the entered credentials. Once the connection succeeds, the Run the install button appears. Click on it. Complete the Information needed form to set up your site title, username, password, and email, and then click Install WordPress. It is recommended to choose a non-generic username for security.
In this section, we will enable WordPress Multisite and create the two additional sites mentioned in the Prequisites section of this article.
A PHP constant has to be defined in the wp-config.php file to enable the Network Setup page.
Edit the wp-config.php file:
nano /usr/share/nginx/wordpress/wp-config.php
Add the following code before the comment /* That's all, stop editing! Happy blogging. */:
/* Multisite settings */
define( 'WP_ALLOW_MULTISITE', true );
We will be editing this file a few more times during this tutorial. Feel free to add all of the new lines in the /* Multisite settings */ section we just created.
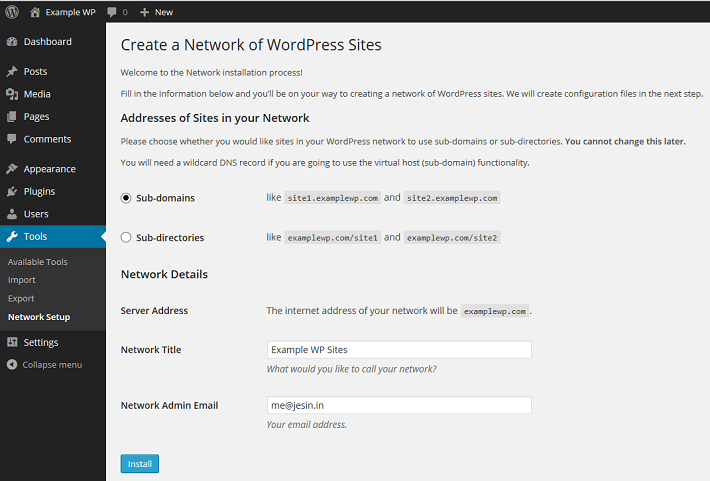
Save the file. Log in to the WordPress admin panel and navigate to Tools > Network Setup. Choose the Sub-domains option, modify the Network Title as desired, and then click Install.
You will be presented with two blocks of code to be added in the wp-config.php and .htaccess files. Copy the wp-config.php code which looks similar to the following:
define('MULTISITE', true);
define('SUBDOMAIN_INSTALL', true);
define('DOMAIN_CURRENT_SITE', 'examplewp.com');
define('PATH_CURRENT_SITE', '/');
define('SITE_ID_CURRENT_SITE', 1);
define('BLOG_ID_CURRENT_SITE', 1);
Edit the wp-config.php file.
nano /usr/share/nginx/wordpress/wp-config.php
Add these lines before the comment /* That's all, stop editing! Happy blogging. */ and save it. The code displayed for .htaccess can be ignored, as Nginx does not have this file.
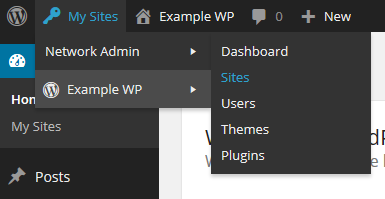
Log out of the WordPress admin panel, and log in again. From the admin toolbar on the top left, navigate to the My Sites > Network Admin > Sites.
Click the Add New button to open the Add New Site form. The following screenshot shows the filled-in details for the shopping site in our example. The Site Address entered will form the subdomain of this site.
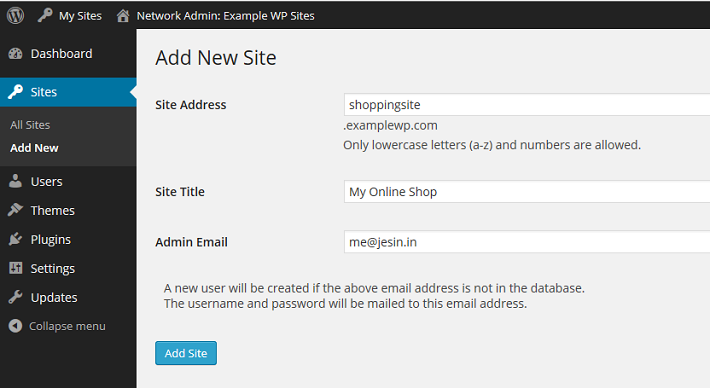
Click Add Site and the created site will be accessible via http://shoppingsite.examplewp.com.
Repeat these steps to create the second site (companysite.examplewp.com in our example).
What you should see now:
The following three WordPress sites:
Each of them will have their own content, theme, and active set of plugins.
In this section, we will enable you to use a separate domain name for each WordPress site, by downloading and enabling the WordPress MU Domain Mapping plugin. This plugin allows users of WordPress Multisite to map their blog/site to another domain.
Log in to your Droplet via SSH and download the WordPress MU Domain Mapping plugin. First install the unzip command, and then extract the plugin.
wget http://downloads.wordpress.org/plugin/wordpress-mu-domain-mapping.latest-stable.zip
apt-get install unzip
unzip wordpress-mu-domain-mapping.latest-stable.zip
Move the extracted files to the WordPress plugin directory.
mv wordpress-mu-domain-mapping /usr/share/nginx/wordpress/wp-content/plugins/
Copy the sunrise.php file from the plugin's directory to the wp-content directory.
cp /usr/share/nginx/wordpress/wp-content/plugins/wordpress-mu-domain-mapping/sunrise.php /usr/share/nginx/wordpress/wp-content/
Edit the wp-config.php file and add the following line before the comment /* That's all, stop editing! Happy blogging. */.
File: /usr/share/nginx/wordpress/wp-config.php
define('SUNRISE', 'on');
Save this file and return to the web browser. From the WordPress toolbar navigate to My Sites > Network Admin > Plugins.

Click the Network Activate link under the WordPress MU Domain Mapping plugin. Go to Settings > Domain Mapping and make changes to the Domain Options as follows:
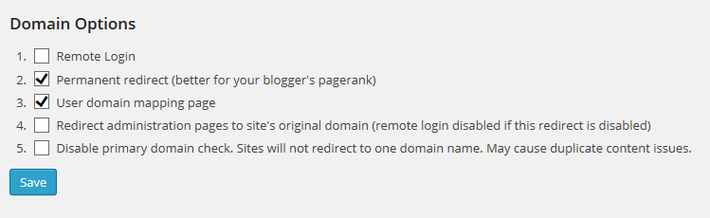
Click Save once done. These settings redirect all requests for subdomains (like companysite.examplewp.com) to their respective external domains (like companysite.org) including the administration pages (/wp-admin).
In the next step we will be mapping a domain name to each site based on its site ID. There are many ways to find the ID of a site but for easier administration we will create a simple WordPress Must-use plugin that displays an additional ID column on the Sites page.
Log in to your Droplet via SSH and create an mu-plugins directory.
mkdir /usr/share/nginx/wordpress/wp-content/mu-plugins
Create a PHP file inside this directory and paste the code that follows:
nano /usr/share/nginx/wordpress/wp-content/mu-plugins/wpms_blogid.php
You can copy this content exactly:
<?php
add_filter( 'wpmu_blogs_columns', 'do_get_id' );
add_action( 'manage_sites_custom_column', 'do_add_columns', 10, 2 );
add_action( 'manage_blogs_custom_column', 'do_add_columns', 10, 2 );

function do_add_columns( $column_name, $blog_id ) {
    if ( 'blog_id' === $column_name )
        echo $blog_id;
    return $column_name;
}

function do_get_id( $columns ) {
    $columns['blog_id'] = 'ID';
    return $columns;
}
The Sites > All Sites section should now show an additional ID column.
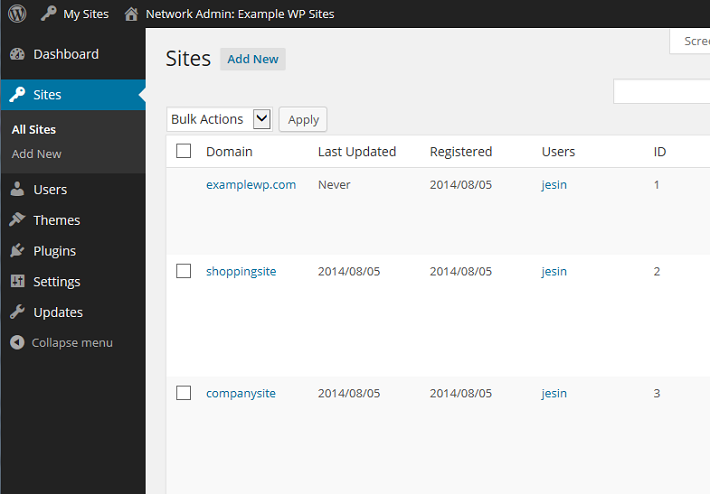
Note down the ID values for each site and go to the Settings > Domains page. Enter the site ID followed by the external domain for the site. For example, since companysite has an ID of 3, on this page, the Site ID should be 3, and the domain should be companysite.org.
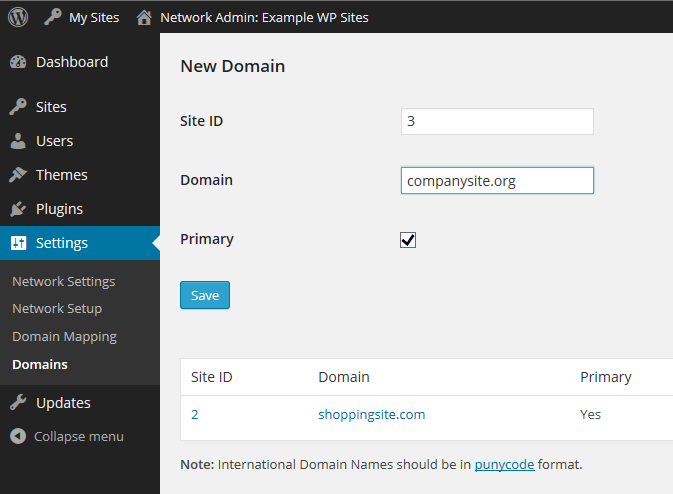
You may add a "www" prefix if you wish to set the site URL as www.companysite.org. Repeat these steps for the other domains. Click Save at the bottom of the page.
What you should see now:
Each site will have its own domain name instead of a subdomain; i.e., entering http://companysite.org in your browser will open the My Online Company Site. You can check this now by visiting http://shoppingsite.com and http://companysite.org. You should see the site title change in the upper left corner of the page.
Now each site can be maintained separately through its own WordPress admin panel:
http://examplewp.com/wp-admin/
http://shoppingsite.com/wp-admin/
http://companysite.org/wp-admin/
Updates to the core/plugins/themes and installation of plugins/themes should be done from the network admin page of the primary domain:
http://examplewp.com/wp-admin/network/* 출처 : https://www.digitalocean.com/community/tutorials/how-to-set-up-wordpress-multisite-with-nginx-on-ubuntu-14-04
| [워드프레스] 우커머스 옵션 상품 설정하기 (0) | 2019.03.19 |
|---|---|
| 워드프레스 Prefix 변경하기 (1) | 2019.03.02 |
| 워드프레스 로그인페이지 리다이렉트 문제 (0) | 2018.02.18 |
| 위젯만들기2 - 위젯설정창에서 form 값 받아오기(광고넣기위젯) (0) | 2012.08.13 |
| 제작한 플러그인에 설정메뉴 넣기 (0) | 2012.08.10 |
Centos 환경에서만 가능
https://github.com/php79/stack
| LEMP스택 설치 -우분투 서버에 MariaDB 데이터베이스 설치하기 (마리아디비) (0) | 2019.05.06 |
|---|---|
| LEMP스택 설치: NGINX 웹서버에 PHP 7 설치하기 및 설정 (PHP7.2-FPM) (0) | 2019.05.06 |
| Nginx Php 세팅 오류/ 502 BadGateway ([emerg] "fastcgi_pass" directive is duplicate in /etc/nginx/sites-enabled/default:58) (0) | 2016.09.04 |
| php 파일업로드 크기 제한 설정 php.ini (nginx) (0) | 2016.02.14 |
| php sendmail mail.. 작동.. (0) | 2015.12.16 |
워드프레스 + 그누프레스 + NGINX 환경에서 구축 중
멀티페이지 설정 중 /wp/wp-config.php 파일 건들다가 로그인 후에도 로그인페이지로 계속 리다이렉트 되는 문제 발생하여 아래와같이 셋팅 후 이상없음
/* That's all, stop editing! Happy blogging. */
/*define('MULTISITE', true);*/
define('WP_ALLOW_MULTISITE', true);
define('DOMAIN_CURRENT_SITE', 'bobss.ml');
define('PATH_CURRENT_SITE', '/wp/');
define('SITE_ID_CURRENT_SITE', 1);
define('BLOG_ID_CURRENT_SITE', 1);
| 워드프레스 Prefix 변경하기 (1) | 2019.03.02 |
|---|---|
| How To Set Up WordPress Multisite with Nginx on Ubuntu 14.04(NGINX, 워드프레스 설치, 멀티사이트) (0) | 2018.02.18 |
| 위젯만들기2 - 위젯설정창에서 form 값 받아오기(광고넣기위젯) (0) | 2012.08.13 |
| 제작한 플러그인에 설정메뉴 넣기 (0) | 2012.08.10 |
| 위젯 만들기 (0) | 2012.08.10 |
1편 혼자서 법인등기에 이어, 법인인감카드 발급과 사업자등록 방법을 정리해봅니다.
서울중앙지방법원 등기국에 서류를 내고 이틀 정도 있다가 인터넷 등기소 에 가서 ‘체커’라고 검색을 해보니, 등기가 완료되었더라고요.

법인은 인감증명서를 발급하기 위해서 카드가 필요하더군요. 법인인감카드발급신청서 를 작성해서 가까운 등기국에 방문합니다. ( 서초동 중앙지법 등기국말고 집 주위에 가까운 등기국에 가면 됩니다. )
저는 서울남부지방법원 등기국으로 가서 인감카드 발급 후 무인기에서 1부당 1,000원씩에 인감5부, 등본5부를 발급했습니다.
참고로 별생각 없이 목동에 서울남부지방법원에 등기국이 있겠거니 하고 갔는데, 작년 6월부터 등기국이 몇몇 지역이 통합돼서 구로세무서 옆으로 이사했더라고요. -_-; 서쪽에 사시는 분들은 괜히 목동 갔다가 헛걸음하지 마시고 구로세무서 옆으로 가세요~
이제 인감과 등본을 발급받았으니 사업자등록을 하러 갑니다. 그전에, 사업자 등록에는 몇몇 서류가 필요한데요.
저는 법인 명의 재계약 대신 사업장 무상사용 승낙서를 임대인에게 받았습니다.
서류가 전부 준비되었다면 서류를 들고 세무서로 갑니다~ 저는 강서 세무서로 갔습니다. 주차비도 안 받고, 사람도 거의 없어서 준비만 잘해가시면 금방 끝납니다. 저는 업태/종목을 찾느라 20분 정도 걸렸는데요, 가시기 전에 정관에 등록한 사업목적에 맞는 업태/종목을 미리 정리해서 가시면 금방 끝내실 수 있어요!

이거 한 장 받겠다고, 몇~일을 고생했습니다. ㅋㅋㅋ
이제 법인통장, 법인카드, 공인인증서 만들러 은행에 갑니다!
| ftp 533 error (0) | 2018.12.08 |
|---|---|
| KT GIGA WIFI 포트포워딩 하는법 (3) | 2018.07.16 |
| [펌]혼자서 법인만들기 – 1편 법인등기 (0) | 2016.12.19 |
| [SlideShare](메모) 나는 개발잔데 왜 자신이없을까? (0) | 2013.10.21 |
| 이클립스 안드로이드 프로젝트명 바꾸기 (0) | 2013.07.31 |
인터넷 등기소의 법인 상호 검색 서비스를 통해 (http://www.iros.go.kr/ifrontservlet?cmd=INSEWelcomeNseFrmC) 설립하고자 하는 법인 이름을 입력해봅니다.

저는 서울중앙지방법원에 등기 할 예정이라 관할등기소를 서울중앙지방법원으로 선택하고 이름을 입력해보니, 아직 ‘체커’라는 이름은 등록되어 있지 않더라고요. 중복되지 않는 상호를 정했다면 1단계는 완료!
법인의 본점으로 사용할 장소가 필요합니다. 알아보니 세 가지 방법이 가능하더군요.
1) 법인 대표이사 자택
2) 법인 대표이사 명의로 계약된 임대 건물
3) 전전세 또는 부동산무상사용승낙
법인 등록에는 ‘주식회사설립등기신청서’, ‘정관’, ‘발기인총회의사록’, ‘기간 단축동의서’, ‘주식발행사항동의서’, ‘주식인수증’, ‘주주명부’, ‘취임승낙서’, ‘인감개인신고서’ 을 비롯해 설립에 참여하는 발기인과 감사의 인감, 주민등록등본, ‘잔고증명서’, ‘등록세영수증’이 필요합니다. (엄청 많죠 -_-; 이래서 법무사에 그냥 맡기나 봅니다..ㅋㅋ)
서류가 이렇게 많다는 사실을 깨닫고, 저는 이 문서들을 가장 빠르고 쉽게 만들 수 있는 사이트를 찾다가 이지비즈라는 사이트에서 법인설립에 필요한 문서를 쉽게 만들었습니다. 수수료로 33,000원을 받긴하는데 법인 만드는 동안 다양한 도움을 받았습니다. 싸게 문서를 제공해주는 대신 TM을 통해서 법인 세무대리인이 필요하니 본인들한테 맡겨달라는 그런 마케팅을 하시더군요. 기존에 알고 계시는 세무사가 없으신 분들은 아마 여러모로 도움이 되실 것 같아요.
저는 이지비즈에서 다음과 같이 정보를 입력하고, ‘주식회사설립등기신청서’를 비롯해 10여가지의 문서를 자동으로 만들었습니다.

이때 중요한 게 사업목적인데요. 처음에 별생각 없이 ‘뭔 사업 목적을 입력하래~’ 하면서 ‘소프트웨어 개발 및 공급’, ‘소프트웨어 컨설팅’ 이렇게 두 가지 정도만 입력했는데요, 알고 보니 추후 법인 사업자등록증에 업종/업태를 추가하기 위해서는 사업목적에 해당 업종/업태에 관련된 목적이 있어야 하더군요. (라고 이지비즈 TM 담당자가 이야기해줬습니다.) 그래서 저는 위처럼 15개의 사업목적을 추가했습니다.
이제부터 약간 고된작업의 시작입니다. 은행에가서 자본금이 입금된 통장의 잔고증명서를 발급해야 합니다.
만약 자본금이 1000만원이고, 주주로 참여한 사람이 2명이며 각각 500만원의 자본금을 내기로 했다면, 대표이사의 빈 통장에 1000만원을 입금한 다음 은행에가서 ‘OOO 계좌에 잔고증명서 발급해주세요’ 하면 발급해줍니다.
이때 중요한 건 잔고증명서에 기재되는 날짜가 있는데요 (이지비즈 사이트에 입력했던 날짜), 이 날짜를 기준으로 정관을 비롯해 법인등기에 필요한 수많은 서류의 기준 날짜가 되므로 이 기준 날짜에 해당하는 날에 은행에 가셔야 합니다!
원래는 구청에 가서 납부를 해야 하는데, 인터넷으로도 납부가 가능해서 저는 5분만에 인터넷으로 냈습니다. 구청에서 내시려면 ‘주식회사설립등기신청서’을 들고 구청 세무과에 가시면 됩니다.
이제 수많은 서류에 도장을 찍어야 할 시간입니다. 저는 근처 도장집에 가서 6만원주고 굵고, 이쁘고, 고급진 법인도장을 하나 만들었습니다. 그리고 발기인과 감사로 참여한 분들께 인감도장과 인감증명서, 주민등록등본 1통씩을 요청했습니다.
여기서 도장을 찍으려고 수많은 문서를 쳐다보고 있으면.. 도장을 찍으라고 하는곳이 너무 많아서 머리가 복잡합니다. (걱정하지 마세요. 서울중앙지방법원 등기국에 가니 도장 어디에 찍으라고 다 알려주는 법원 직원이 계십니다. 호호호) 그래서 저는 뭘 찍어야 할지 헷갈리는 부분은 그대로 두고 모든 인감도장(대표이사 및 발기인, 감사)을 챙겨서 등기국으로 갔습니다.
저는 차 가지고 갔다가, 주차하는데 거의 30분 넘게 걸렸습니다. 주차장이 매우 협소해서 가급적이면 대중교통으로 가세요…ㅜ.ㅜ 번호표 뽑고 담당자한테 가서, ‘제가 혼자 법인을 만들다 보니 도장을 어디에다가 찍어야 할지 몰라서 그냥 가져왔는데, 어디에 찍어야 하는지 알려주실 수 있을까요?’ 라고 이야기했더니 ‘왜 법무사한테 안 하고 혼자 하냐’는 표정으로 쳐다보시며, ‘종합민원실’에 ‘법인설립’이라고 써진 곳에 가서 서류 검토를 하고 오라고 하시더군요. 매우 전문적으로 생기신 분이 제가 가져간 서류들을 보며 도장을 찍어야 할 곳을 정확하게 알려주시면서 서류들을 스테이플러로 하나씩 찝어주시더라고요.(정말 친절합니다) 몇 분간 검토를 해보시더니, 혼자 한 것치고는 빠진 서류도 없고, 서류 하나하나 모두 완벽해 보인다며 칭찬하시며 이제 신청하고 집에 가랍니다.
참, 서류를 신청하기 전에 등기신청수수료 (30,000원)을 내야 하는데 현금을 챙겨가시면 1분 만에 무인처리기에서 수수료를 낼 수 있습니다! 현금이 없으면, 은행에 가서 15~20분씩 기다리며 납부해야하니 현금을 꼭 챙겨가시길…
저는 이 방법으로 첫날 서류준비, 다음날 등기국 방문으로 이틀 만에 법인 등기를 신청 했습니다.
등기가 완료되면, 다시 등기국에 가서 법인인감카드 등록, 세무서에서 사업자 등록, 은행에서 법인통장개설 등을 개설해야 한다고 하니 등기가 완료된 후에 해야 할 일들을 또 써보도록 하겠습니다.
혼자 법인 만드시는 분들께 도움이 되시길~~ 
| KT GIGA WIFI 포트포워딩 하는법 (3) | 2018.07.16 |
|---|---|
| [펌]혼자서 법인만들기 – 2편 사업자등록 (0) | 2016.12.19 |
| [SlideShare](메모) 나는 개발잔데 왜 자신이없을까? (0) | 2013.10.21 |
| 이클립스 안드로이드 프로젝트명 바꾸기 (0) | 2013.07.31 |
| 리눅스 사용자 root 권한주기 (0) | 2013.07.11 |
nwjs를 이용하여 작동되는 웹사이트를 데스크탑 어플리케이션처럼 만드는 방법에 관해서 소개를 해봅니다. 우리가 이 글에서 논하고자하는 것은 웹기술을 이용하여 독립된 어플을 만드는 일반적인 SPA형 어플리케이션이 아니라, 그냥 웹서비스로 접속해도 되는 것을 단순하게 어플리케이션으로 랩핑만하여 제공하는 것에 대한 이야기입니다.
'어차피 브라우저를 통해서 접속하면 되는 것을 굳이 어플리케이션처럼 만들어서 뭐가 좋은가?'라고 할 수 있습니다. 사실 이미 만들어진 것을 랩핑하는 것이라서 환경을 셋팅하는 것 이외에는 그다지 힘이 들지 않습니다. 하지만 단순하게 랩핑하는 것만으로도 아래와 같은 많은 장점들이 있습니다.
웹 서비스를 런칭한 이후에는 우리는 많은 광고비를 뿌려 구글과 페이스북에서 사용자들을 유입시키려 노력합니다. 그럼에도 불구하고 웹서비스는 영원히 접근할 수 없는 앱 마켓라는 벽이 존재합니다. 아직까지 윈도우스토어는 활성화되어 있지 않지만 OSX의 경우에는 앱마켓의 접근성이 좋아서 많은 분들이 사용합니다. nwjs를 통해서 랩핑을 하는 경우에 이와 같은 마켓에 등록하여 마케팅 채널을 하나 확보하는 셈이 될 수 있습니다. 와 공짜 마케팅이다
익스플로러 최신버전은 HTML5나 CSS3 스펙을 무리없이 사용가능합니다. 그러나 아직까지 한국에서는 많은 사용자들이 익스플로러 엣지 이전버전을 사용하기 때문에, 웹서비스를 지속적으로 제공함에 있어서 의식할 수 밖에 없는 문제들이 있습니다. 죽어라 익스플로러!! 조삼모사같이 느껴질 수도 있지만, 이러한 고객분들에게 nwjs로 랩핑된 데스크탑 어플리케이션 설치를 유도하면 자연스럽게 지속적으로 웹키트 엔진으로의 사용을 유도하게 됩니다.
독립된 프로그램처럼 작동한다는 것은 곧 작업표시줄에서 브라우저안에 탭으로 존재하는 다른 서비스와 다르게 직접적인 접근성을 확보할 수 있다는 이야기가 됩니다. 창이 따로 논다는 것은 사용자의 활용도에 따라 여러가지로 이점을 제공합니다. 가상 화면을 통해서 하거나 단축키를 통해서 사용되어질 수도 있고, 특정 창크기로 고정하여 사용하게될 수도 있습니다.
브라우저상에서 동작하도록 설계된 원래의 웹사이트 목적상, 아무래도 랩핑한 프로그램에서 네이티브 API를 많이 활용하지는 않을 것입니다. 그래도 조건부라도 마음만 먹으면 활용할 수 있으니 일단 장점에 포함된다 생각합니다. nwjs가 활용할 수 있는 네이티브의 목록은 여기에 있습니다.
랩핑을 하는 최초의 과정 이외에 추가적으로 드는 비용이 거의 제로에 가깝습니다. nwjs 전용으로 모든 정적 리소스들을 사용하는 경우라면 조금 다를지 모르겠습니다. 그런데 실제로 돌아가는 사이트를 랩핑하는 것은 모든 자원을 원격에서 끌어와서 동작시키는 것이라, 사실상 이 프로그램은 우리의 웹사이트 하나만을 띄우는 전용 브라우저가 되는 셈이 됩니다.
 이전에는 Node-Webkit이라고 불리었으며, 요새 유행하는 Electron(aka atom-shell)과 비슷하게 Chromium과 Node.js 기반에 데스크탑 어플리케이션에서 웹을 구동할 수 있는 좋은 도구입니다. 그래서 데스크탑에서 실행하는 어플리케이션에다가 기존 웹 개발 방법대로 설계 코딩할 수 있습니다.
NWJS vs Electron 에서 둘을 비교한 표를 볼수 있습니다. 간단히 살펴보면,
최초에는Electron을 이용하여 제작을 시도하였으나, Electron의 webview를 썼을 때에 기본 자바스크립트의 confirm, alert, prompt, beforeunload 등이 정상적으로 작동되지 않는 문제점이 있었습니다. 즉, 웹브라우저라면 당연히 되어야하는 스펙들이 Electron Webview에서는 알게모르게 제한이 되는 경우가 있습니다. 분명 안되는것이 더 많겠지만 이쯤에서 깔끔하게 포기하고 nwjs로 돌아서서 더 이상은 모르겠습니다. Electron이 대세인 느낌은 있지만 이렇게 랩핑을 하는 목적으로는 적합하지 않았습니다.
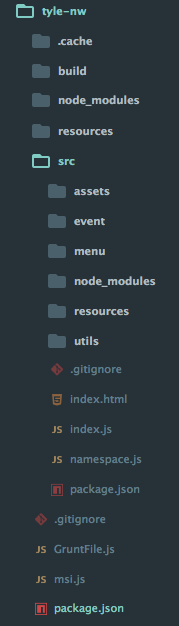
항상 개발 처음 시작할 때 디렉토리 구조를 어떻게 잡을까 부터 고민을 하여 보일러플레이트를 참고하거나 자신만의 구조를 잡기 마련입니다. 저희는 처음 해보는 부분이라 보편적인 디렉토리 구조를 따랐습니다.
NWJS는 아래 예시와 같이 production 배포 부분과 빌드하기 위한 부분을 나뉘어 구조를 잡는게 편합니다. 왜냐하면 빌드에 필요한 node modules이나, resources나 그외 빌드 관련 소스들은 production에 포함되지 않아도 상관없기 때문입니다.
주요 부분
이외 특이한점은 package.json가 빌드 디렉토리와 production 디렉토리에 각각 한개씩 존재합니다. 이는 node module 설치를 다르게 하고, NWJS Config 설정, 빌드 스크립특 작성등 각 용도에 맞게 분기 시키기 위함입니다.
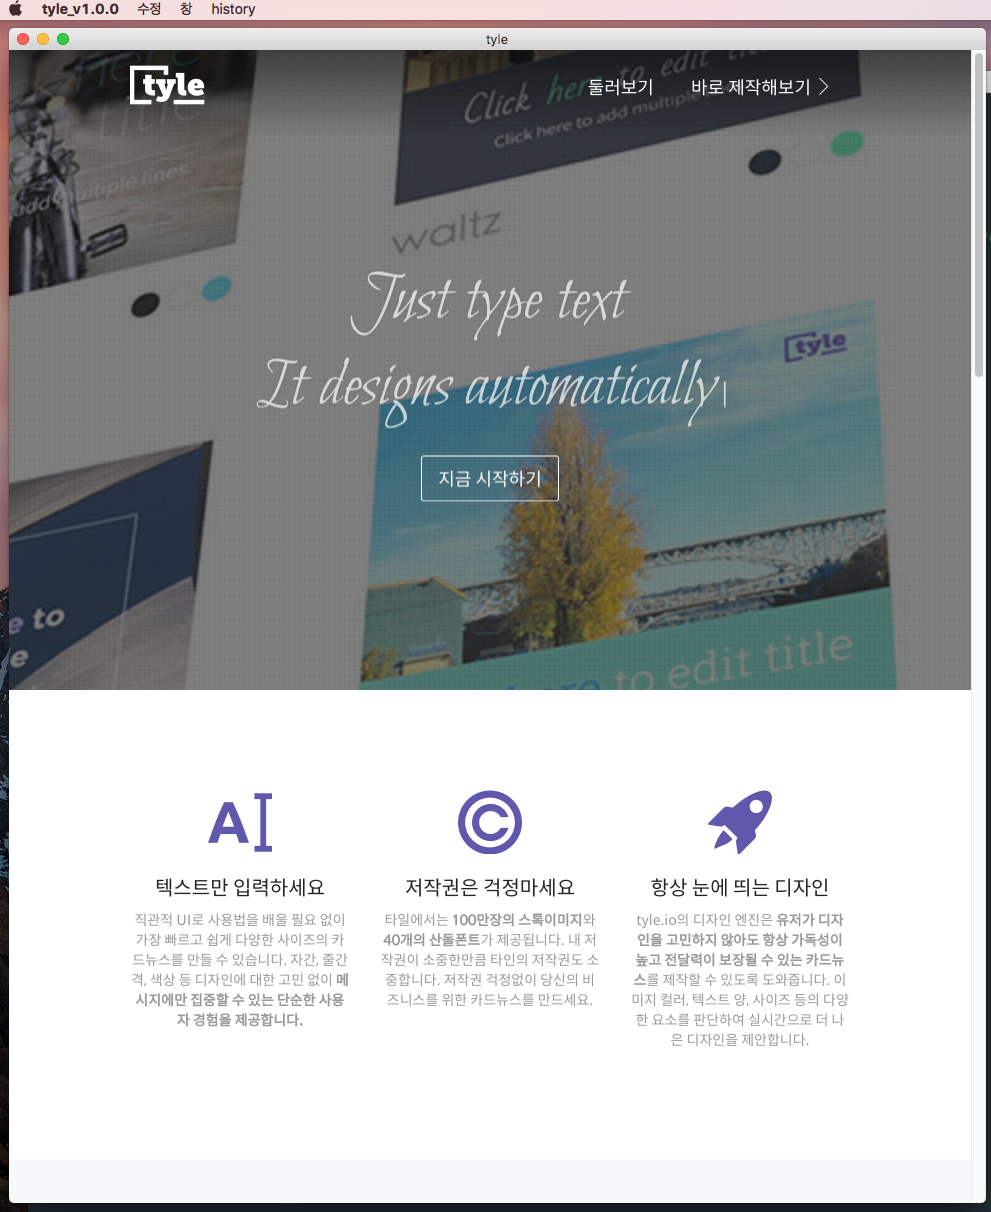
iframe으로 호출loaded)와 Native Window Event Handler(close) 등록기존 서비스중인 tyle.io를 iframe으로 호출
// etnry point HTML에 iframe 쓰던 방식 적용
<iframe src="https://tyle.io" id="tyle" ></iframe>
상단에 Native Menu Bar를 설정
var MenuItems = {
"darwin" : { //mac
    "history" : [   // menu label
      {
        label : '뒤로', click : function(){ window.history.back(); }, key: '[', modifiers: 'cmd'
      },
      {
        label : '앞으로', click : function(){ window.history.forward(); }, key: ']', modifiers: 'cmd'
      },
      {
        label : '새로고침', click : function(){ document.getElementById('tyle').contentDocument.location.reload(true); }, key: 'R', modifiers: 'cmd'
      }
    ]
},
"win" : { //window
    "history" : [   // menu label
      {
        label : '뒤로', click : function(){ window.history.back(); }, key: '[', modifiers: 'ctrl'
      },
      {
        label : '앞으로', click : function(){ window.history.forward(); }, key: ']', modifiers: 'ctrl'
      },
      {
        label : '새로고침', click : function(){ document.getElementById('tyle').contentDocument.location.reload(true); }, key: 'R', modifiers: 'ctrl'
      }
    ]
}
}

// Menu 생성
var addMenu = function(){
var topMenu = new nw.Menu({type: "menubar"});
// mac이랑 winodw,linux는 다른 menu 프로세스를 제공하기 위해 또 Menubar 객체를 할당
var menuBar = topMenu;
//darwin===mac 이고, 따로 menubar를 생성 후에 시작.
if(process.platform === 'darwin'){
  topMenu.createMacBuiltin("tyle");
  menuBar = win.menu = topMenu;
}
// menuItems' 에서 메뉴들을 가져와 등록.
for (var menuKey in MenuItems) {
  if (MenuItems.hasOwnProperty(menuKey)) {
    var submenu = new nw.Menu();
    MenuItems[menuKey].forEach(function(menuItem){
      submenu.append(new nw.MenuItem(menuItem));
    });
    menuBar.append(new nw.MenuItem({
      label : menuKey,
      submenu : submenu
    }));
  }
}

// window,linux 는 따로 menu를 window에 등록.
if(process.platform !== 'darwin'){
  win.menu = menuBar;
}
}
Window Event(loaded)와 Native Window Event Handler(close) 등록
window ifrmae이 호출 된 이후 loaded 이벤트가 호출 됩니다. (
dom ready랑 비슷 합니다.)
Native Window 를 닫으면 close 이벤트가 호출 됩니다.
var nw = require('nw.gui');

// 이벤트 정의
var BrowserEvent = {
    evtList : ['close','loaded'],
    close : function(){},
    loaded : function(){}
}
// 필요한 이벤트들 NW.GUI를 통해 등록
var addEvent = function(){
  BrowserEvent.evtList.forEach(function(evt){
    nw.Window.get().on(evt, BrowserEvent[evt]);
  },this);
}
Mac(x64)용 dmg, Window(x64,32)용 MSI installer 생성(Linux 제외)
Grunt-nw-builder를 참고하고, nw-builder 레퍼런스와 비슷합니다.
grunt-nw-builder 는 grunt 기반으로 만들어진 nw-builder 모듈로써 nwjs를 빌드 패키징 작업을 통해서 저희가 실제로 데스크탑 어플리케이션 APP을 생성시켜주며, 인스톨러도 만들어줍니다. 또한 msi-pacakger는 빌드된 결과물을 window installer로 만들어줍니다.
module.exports = function(grunt) {
grunt.initConfig({
nwjs: {
  options: {
        name : 'tyle',
        platforms: ['osx64','win64'],
        macIcns : './src/resources/osx/tyle_logo_electron.icns',
        winIco : './src/resources/windows/tyle_logo_electron.ico',
        cacheDir : './.cache',
        buildDir: './build',
        flavor: 'normal',
        zip : true,
        zipOptions : {
          forceLocalTime : true,
          comment : "tyle.io desktop app window version"
        },
        macPlist: {
            CFBundleDevelopmentRegion: "ko",
            CFBundleDisplayName: "tyle",
            CFBundleName: "tyle",
        }
  },
  src: './src/**/*' // Your NW.js app
},
appdmg: {
  options: {
    basepath: './',
    title: 'tyle-mac',
    icon: 'src/resources/osx/tyle_logo_electron.icns',
    background: 'resources/osx/dmg-background.png',
    contents: [
      {x: 370, y: 160, type: 'link', path: '/Applications'},
      {x: 140 , y: 160, type: 'file', path: 'build/tyle/osx64/tyle.app'}
    ]
  },
  target: {
    dest: 'build/tyle/osx64/tyle-mac.dmg'
  }
}
});

grunt.loadNpmTasks('grunt-nw-builder');
grunt.loadNpmTasks('grunt-appdmg');

grunt.registerTask('default', ['nwjs','appdmg']);
};
// window msi installer
var createMsi = require("msi-pacakger");
var options = {
// required
source: '~/tyle-nw/build/tyle/win64',
output: '~/tyle-nw/build/tyle/msi',
name: 'tyle',
upgradeCode: 'YOUR-GUID-HERE',
version: '1.0.0',
manufacturer: 'loopjs.com',
iconPath: '~/tyle-nw/src/resources/windows/tyle_logo_electron.ico',
executable: 'tyle.exe',
// optional
arch: 'x64',
localInstall: true
}
createMsi(options, function (err) {
if (err) throw err
console.log('Outputed to ' + options.output)
})어플리케이션 종료 후 열때 종료할때 window size 로 resizing
window를 종료할 경우 close 이벤트에서 현재 종료창의 사이즈를 로컬 저장소에 json file 로 저장합니다. 그리고 다시 앱을 열었을 때 기존에 저장해놓은 사이즈를 가져와 window를 리사이징을 진행 하는 방식입니다.
tyle.windowSize = (function(){
var jetpack = require('fs-jetpack');
var win = require('nw.gui').Window.get();
var pjson = require('./package.json');

// window size를 저장할 공간(directory) 설정
var userDataDir = jetpack.cwd(nw.App.dataPath);
var stateStoreFile = 'window-state-tyle.json';

// 기본 window size (package.json 에서 가져온다)
var defaultSize = {
    width : pjson.window.width,
    height: pjson.window.height
};

// 상태 저장 객체
var state = {};

/*
    저장된 window size 반환
*/
var restore = function(){
var restoredState = {};

try{
    restoredState = userDataDir.read(stateStoreFile, 'json');
}catch(err){
}return Object.assign({}, defaultSize, restoredState);
}

/*
    현재 window size 구하기
*/
var getCurrentPosition = function(){
    return {
        width    : win.width,
        height    : win.height
    }
}

/*
    현재 window size 저장
*/
var saveState = function(){
    Object.assign(state, getCurrentPosition());
    userDataDir.write(stateStoreFile, state, {atomic : true});
}

/*
    생성된 window resizing 하
*/
var resize = function(){
    var resize = restore();win.width = resize.width;
win.height = resize.height;
}

return {
    restore : restore,
    save     : saveState,
    resize    : resize
}
})();위 요구사항에 맞게 개발을 진행하면 아래와 같이 기본적인 골격을 갖추게 됩니다. 전반적인 소스를 공유하진 않았지만, 큰 틀에서 벗어나지 않은 것이기 때문에 쉽게 적용할 수 있습니다.
iframe 방식으로 기존에 개발해놓은 웹을 그대로 가져다 쓸수있고 설치방식과 Chromium 기반이기 때문에 IE에서 겪던 문제를 해결 할 수 있는 좋은 기회를 가질 수 있습니다.
자 다들 시작 해보시죠?
위에 기술하였듯이 랩핑하는 것만으로 많은 효과들이 있습니다. 하지만 보다 이질감이 없는 사용자 경험을 위하여 데스크탑 어플과 같은 빠른 반응속도를 보장하여야합니다. 전통적인 페이지 리다이렉션으로 인해서 버튼 클릭마다 blank 화면이 번쩍거린다면 사용자로 하여금 내가 가짜 앱을 사용하고 있다고 느끼게 하기 때문이지요.
따라서 Single Page Application으로 제작하여 Spinner가 표시되더라도 UI가 사용자 행동에 즉각 반응하는 것이 좋고, 페이지 리다이렉션이라면 pjax등을 통하여 어떻게든 빠른 반응이 나타나도록 하는 것이 좋습니다(참고 : https://blog.tyle.io/posts/52)
[출처 : https://blog.tyle.io/posts/67, https://nwjs.io/]
| Adobe CC 크랙(2018) (2) | 2018.07.17 |
|---|---|
| 맥 파인더(Finder)와 서버 연결 (0) | 2013.08.12 |
| 맥 OSX 에서 NDK PATH설정하기 (0) | 2013.08.02 |
1. Ubuntu Nginx, Php5 세팅해주는 과정에서 오류가 발생
$sudo nano /etc/nginx/sites-available/default
.
.
...
location ~ \.php$ {
try_files $uri =404;
fastcgi_split_path_info ^(.+\.php)(/.+)$;
# # NOTE: You should have "cgi.fix_pathinfo = 0;" in php.ini
#
# # With php5-cgi alone:
fastcgi_pass 127.0.0.1:9000;
# # With php5-fpm:
fastcgi_pass unix:/var/run/php5-fpm.sock;
fastcgi_index index.php;
include fastcgi_params;
}
이렇게 세팅을 해줬더니 502 Bad GateWay 오류가 났다.
로그를 찍어보니
$ nginx -t
nginx: [warn] server name "http://bobss.tk" has suspicious symbols in /etc/nginx/sites-enabled/default:28
nginx: [emerg] "fastcgi_pass" directive is duplicate in /etc/nginx/sites-enabled/default:58
nginx: configuration file /etc/nginx/nginx.conf test failed
default파일에서 오류가 발생해서 검색해보니
" The location block provided results in error: nginx: [emerg] unknown directive "fast_cgi_split_path_info" in /etc/nginx/sites-enabled/default:56 Need to remove the underscore between fast and cgi: fastcgi_split_path_info ^(.+\.php)(/.+)$; "
Then comment the first case with php5-cgi alone since php5-fpm is already installed.
I came with the same problem. Hope this could help you.
.
.
...
location ~ \.php$ {
try_files $uri =404;
fastcgi_split_path_info ^(.+\.php)(/.+)$;
# # NOTE: You should have "cgi.fix_pathinfo = 0;" in php.ini
#
# # With php5-cgi alone:
# fastcgi_pass 127.0.0.1:9000;
# # With php5-fpm:
fastcgi_pass unix:/var/run/php5-fpm.sock;
fastcgi_index index.php;
include fastcgi_params;
}
php5-fpm와 cgi 가 중복된다는 뜻인것같아 주석처리후 재시작 했더니 해결
| LEMP스택 설치: NGINX 웹서버에 PHP 7 설치하기 및 설정 (PHP7.2-FPM) (0) | 2019.05.06 |
|---|---|
| PHP 5.3 ~ 7.2 + Nginx + MariaDB + 앱 자동 설치 (0) | 2018.02.18 |
| php 파일업로드 크기 제한 설정 php.ini (nginx) (0) | 2016.02.14 |
| php sendmail mail.. 작동.. (0) | 2015.12.16 |
| Nginx 홈페이지 Rewrite (하드, 임시) (0) | 2015.11.15 |
php 파일 업로드 사이즈는 기본적인 php.ini 수정하여 되었다
(http://jasontody.tistory.com/65 참고)
그런데..
추가적으로 해줘야 될 사항들.
(용량을 크게 늘린다던지 등..)
[ /etc/php5/fpm/php.ini ]

1. file_uploads = On
2. upload_max_filesize 10M
3. post_max_size 10M
4. max_input_time 300
5. max_execution_time 300
6. memory_limit 128M

* post_max_size > upload_max_filesize
[ /etc/nginx/sites-available/default ]
1. client_max_body_size 100M| PHP 5.3 ~ 7.2 + Nginx + MariaDB + 앱 자동 설치 (0) | 2018.02.18 |
|---|---|
| Nginx Php 세팅 오류/ 502 BadGateway ([emerg] "fastcgi_pass" directive is duplicate in /etc/nginx/sites-enabled/default:58) (0) | 2016.09.04 |
| php sendmail mail.. 작동.. (0) | 2015.12.16 |
| Nginx 홈페이지 Rewrite (하드, 임시) (0) | 2015.11.15 |
| Ubuntu Subdomain 설정하기(서브도메인) (0) | 2015.09.26 |
contact_me.php
<?php
// check if fields passed are empty
if(empty($_POST['name']) ||
empty($_POST['email']) ||
empty($_POST['message']) ||
!filter_var($_POST['email'],FILTER_VALIDATE_EMAIL))
{
echo "No arguments Provided!";
return false;
}
$name = $_POST['name'];
$email_address = $_POST['email'];
$message = $_POST['message'];
// create email body and send it
$to = 'jasontody@gmail.com'; // hi mate thanks for purchase guna theme, just replace your email with emailme@myprogrammingblog.com
$email_subject = "Contact form submitted by: $name";
$email_body = "You have received a new message. \n\n".
" Here are the details:\n \nName: $name \n ".
"Email: $email_address\n Message \n $message";
$headers = "From: 3layerglass@contact-3layerglass.com\n";
$headers .= "Reply-To: $email_address";
mail($to,$email_subject,$email_body,$headers);
return true;
?>
했는데 메일이 가지않는문제발생
sudo apt-get install sendmail
그다음
sudo sendmailconfig
| Nginx Php 세팅 오류/ 502 BadGateway ([emerg] "fastcgi_pass" directive is duplicate in /etc/nginx/sites-enabled/default:58) (0) | 2016.09.04 |
|---|---|
| php 파일업로드 크기 제한 설정 php.ini (nginx) (0) | 2016.02.14 |
| Nginx 홈페이지 Rewrite (하드, 임시) (0) | 2015.11.15 |
| Ubuntu Subdomain 설정하기(서브도메인) (0) | 2015.09.26 |
| Ubuntu14.04 기본적인세팅(디지털오션기준) (0) | 2015.09.19 |